LnRiLWNvbnRhaW5lciAudGItY29udGFpbmVyLWlubmVye3dpZHRoOjEwMCU7bWFyZ2luOjAgYXV0b30gI3RiY3NzIC53cC1ibG9jay10b29sc2V0LWJsb2Nrcy1jb250YWluZXIudGItY29udGFpbmVyW2RhdGEtdG9vbHNldC1ibG9ja3MtY29udGFpbmVyPSJlY2VhZmY5NzY4YzE2OTE5YTRkMGExYTliNDk5YzU5ZSJdIHsgYmFja2dyb3VuZDpsaW5lYXItZ3JhZGllbnQocmdiYSggMCwgMCwgMCwgMC40NiApLHJnYmEoIDAsIDAsIDAsIDAuNDYgKSksICByZ2JhKCAxMTksIDExOSwgMTE5LCAxICkgdXJsKCdodHRwczovL2Nvcm5lcnN0b25lLnJvY2tzL3dwLWNvbnRlbnQvdXBsb2Fkcy8yMDI0LzA3L0xvbmctR2FsbGV5LUtpdGNoZW4tbWFkZS1mcm9tLXN0b25lLW91dGRvb3Ita2l0Y2hlbi1tb2R1bGVzLmpwZycpIGNlbnRlciB0b3Agbm8tcmVwZWF0O2JhY2tncm91bmQtYXR0YWNobWVudDogZml4ZWQ7YmFja2dyb3VuZC1zaXplOmF1dG8sIGNvdmVyO3BhZGRpbmc6IDI1cHg7bWFyZ2luLWJvdHRvbTogMjRweDttaW4taGVpZ2h0OiA4NXZoO2Rpc3BsYXk6bXMtZmxleGJveCAhaW1wb3J0YW50O2Rpc3BsYXk6ZmxleCAhaW1wb3J0YW50Oy1tcy1mbGV4LWRpcmVjdGlvbjpjb2x1bW47ZmxleC1kaXJlY3Rpb246Y29sdW1uOy1tcy1mbGV4LXBhY2s6Y2VudGVyO2p1c3RpZnktY29udGVudDpjZW50ZXI7IH0gI3RiY3NzIC53cC1ibG9jay10b29sc2V0LWJsb2Nrcy1jb250YWluZXIudGItY29udGFpbmVyW2RhdGEtdG9vbHNldC1ibG9ja3MtY29udGFpbmVyPSJlY2VhZmY5NzY4YzE2OTE5YTRkMGExYTliNDk5YzU5ZSJdID4gLnRiLWNvbnRhaW5lci1pbm5lciB7IG1heC13aWR0aDogMTIwMHB4OyB9IC50Yi1jb250YWluZXIgLnRiLWNvbnRhaW5lci1pbm5lcnt3aWR0aDoxMDAlO21hcmdpbjowIGF1dG99ICN0YmNzcyAud3AtYmxvY2stdG9vbHNldC1ibG9ja3MtY29udGFpbmVyLnRiLWNvbnRhaW5lcltkYXRhLXRvb2xzZXQtYmxvY2tzLWNvbnRhaW5lcj0iZDlmMmE5ZWFhOTVjOWEzMDU2NTJlNDRhY2JjNDFjNTAiXSB7IHBhZGRpbmc6IDI1cHggMjVweCAwcHggMjVweDsgfSAjdGJjc3MgLndwLWJsb2NrLXRvb2xzZXQtYmxvY2tzLWNvbnRhaW5lci50Yi1jb250YWluZXJbZGF0YS10b29sc2V0LWJsb2Nrcy1jb250YWluZXI9ImQ5ZjJhOWVhYTk1YzlhMzA1NjUyZTQ0YWNiYzQxYzUwIl0gPiAudGItY29udGFpbmVyLWlubmVyIHsgbWF4LXdpZHRoOiAxMjAwcHg7IH0gLnRiLWdyaWQsLnRiLWdyaWQ+LmJsb2NrLWVkaXRvci1pbm5lci1ibG9ja3M+LmJsb2NrLWVkaXRvci1ibG9jay1saXN0X19sYXlvdXR7ZGlzcGxheTpncmlkO2dyaWQtcm93LWdhcDoyNXB4O2dyaWQtY29sdW1uLWdhcDoyNXB4fS50Yi1ncmlkLWl0ZW17YmFja2dyb3VuZDojZDM4YTAzO3BhZGRpbmc6MzBweH0udGItZ3JpZC1jb2x1bW57ZmxleC13cmFwOndyYXB9LnRiLWdyaWQtY29sdW1uPip7d2lkdGg6MTAwJX0udGItZ3JpZC1jb2x1bW4udGItZ3JpZC1hbGlnbi10b3B7d2lkdGg6MTAwJTtkaXNwbGF5OmZsZXg7YWxpZ24tY29udGVudDpmbGV4LXN0YXJ0fS50Yi1ncmlkLWNvbHVtbi50Yi1ncmlkLWFsaWduLWNlbnRlcnt3aWR0aDoxMDAlO2Rpc3BsYXk6ZmxleDthbGlnbi1jb250ZW50OmNlbnRlcn0udGItZ3JpZC1jb2x1bW4udGItZ3JpZC1hbGlnbi1ib3R0b217d2lkdGg6MTAwJTtkaXNwbGF5OmZsZXg7YWxpZ24tY29udGVudDpmbGV4LWVuZH0gI3RiY3NzIC53cC1ibG9jay10b29sc2V0LWJsb2Nrcy1ncmlkLnRiLWdyaWRbZGF0YS10b29sc2V0LWJsb2Nrcy1ncmlkPSIyYmY5ODk3YTQ3ODMwZTA2YmVkYWM3Mjc0MDNjZTNlMyJdIHsgYm9yZGVyLXJhZGl1czogMDttYXJnaW4tYm90dG9tOiA0OHB4O2dyaWQtdGVtcGxhdGUtY29sdW1uczogbWlubWF4KDAsIDAuMzMzMzMzMzMzMzMzMzNmcikgbWlubWF4KDAsIDAuMzMzMzMzMzMzMzMzMzNmcikgbWlubWF4KDAsIDAuMzMzMzMzMzMzMzMzMzNmcik7Z3JpZC1jb2x1bW4tZ2FwOiAyNHB4O2dyaWQtcm93LWdhcDogOHB4O2dyaWQtYXV0by1mbG93OiByb3cgfSAjdGJjc3MgLndwLWJsb2NrLXRvb2xzZXQtYmxvY2tzLWdyaWQudGItZ3JpZFtkYXRhLXRvb2xzZXQtYmxvY2tzLWdyaWQ9IjJiZjk4OTdhNDc4MzBlMDZiZWRhYzcyNzQwM2NlM2UzIl0gPiAudGItZ3JpZC1jb2x1bW46bnRoLW9mLXR5cGUoM24gKyAxKSB7IGdyaWQtY29sdW1uOiAxIH0gI3RiY3NzIC53cC1ibG9jay10b29sc2V0LWJsb2Nrcy1ncmlkLnRiLWdyaWRbZGF0YS10b29sc2V0LWJsb2Nrcy1ncmlkPSIyYmY5ODk3YTQ3ODMwZTA2YmVkYWM3Mjc0MDNjZTNlMyJdID4gLnRiLWdyaWQtY29sdW1uOm50aC1vZi10eXBlKDNuICsgMikgeyBncmlkLWNvbHVtbjogMiB9ICN0YmNzcyAud3AtYmxvY2stdG9vbHNldC1ibG9ja3MtZ3JpZC50Yi1ncmlkW2RhdGEtdG9vbHNldC1ibG9ja3MtZ3JpZD0iMmJmOTg5N2E0NzgzMGUwNmJlZGFjNzI3NDAzY2UzZTMiXSA+IC50Yi1ncmlkLWNvbHVtbjpudGgtb2YtdHlwZSgzbiArIDMpIHsgZ3JpZC1jb2x1bW46IDMgfSAudGItYnV0dG9ue2NvbG9yOiNmMWYxZjF9LnRiLWJ1dHRvbi0tbGVmdHt0ZXh0LWFsaWduOmxlZnR9LnRiLWJ1dHRvbi0tY2VudGVye3RleHQtYWxpZ246Y2VudGVyfS50Yi1idXR0b24tLXJpZ2h0e3RleHQtYWxpZ246cmlnaHR9LnRiLWJ1dHRvbl9fbGlua3tjb2xvcjppbmhlcml0O2N1cnNvcjpwb2ludGVyO2Rpc3BsYXk6aW5saW5lLWJsb2NrO2xpbmUtaGVpZ2h0OjEwMCU7dGV4dC1kZWNvcmF0aW9uOm5vbmUgIWltcG9ydGFudDt0ZXh0LWFsaWduOmNlbnRlcjt0cmFuc2l0aW9uOmFsbCAwLjNzIGVhc2V9LnRiLWJ1dHRvbl9fbGluazpob3ZlciwudGItYnV0dG9uX19saW5rOmZvY3VzLC50Yi1idXR0b25fX2xpbms6dmlzaXRlZHtjb2xvcjppbmhlcml0fS50Yi1idXR0b25fX2xpbms6aG92ZXIgLnRiLWJ1dHRvbl9fY29udGVudCwudGItYnV0dG9uX19saW5rOmZvY3VzIC50Yi1idXR0b25fX2NvbnRlbnQsLnRiLWJ1dHRvbl9fbGluazp2aXNpdGVkIC50Yi1idXR0b25fX2NvbnRlbnR7Zm9udC1mYW1pbHk6aW5oZXJpdDtmb250LXN0eWxlOmluaGVyaXQ7Zm9udC13ZWlnaHQ6aW5oZXJpdDtsZXR0ZXItc3BhY2luZzppbmhlcml0O3RleHQtZGVjb3JhdGlvbjppbmhlcml0O3RleHQtc2hhZG93OmluaGVyaXQ7dGV4dC10cmFuc2Zvcm06aW5oZXJpdH0udGItYnV0dG9uX19jb250ZW50e3ZlcnRpY2FsLWFsaWduOm1pZGRsZTt0cmFuc2l0aW9uOmFsbCAwLjNzIGVhc2V9LnRiLWJ1dHRvbl9faWNvbnt0cmFuc2l0aW9uOmFsbCAwLjNzIGVhc2U7ZGlzcGxheTppbmxpbmUtYmxvY2s7dmVydGljYWwtYWxpZ246bWlkZGxlO2ZvbnQtc3R5bGU6bm9ybWFsICFpbXBvcnRhbnR9LnRiLWJ1dHRvbl9faWNvbjo6YmVmb3Jle2NvbnRlbnQ6YXR0cihkYXRhLWZvbnQtY29kZSk7Zm9udC13ZWlnaHQ6bm9ybWFsICFpbXBvcnRhbnR9LnRiLWJ1dHRvbl9fbGlua3tiYWNrZ3JvdW5kLWNvbG9yOiM0NDQ7Ym9yZGVyLXJhZGl1czowLjNlbTtmb250LXNpemU6MS4zZW07bWFyZ2luLWJvdHRvbTowLjc2ZW07cGFkZGluZzowLjU1ZW0gMS41ZW0gMC41NWVtfSAjdGJjc3MgLnRiLWJ1dHRvbltkYXRhLXRvb2xzZXQtYmxvY2tzLWJ1dHRvbj0iZjAwODE1YzE1YTE2YWQxOGMzNDY2MjQ4MWRhNmQ5YzUiXSB7IHRleHQtYWxpZ246IGNlbnRlcjsgfSAjdGJjc3MgLnRiLWJ1dHRvbltkYXRhLXRvb2xzZXQtYmxvY2tzLWJ1dHRvbj0iZjAwODE1YzE1YTE2YWQxOGMzNDY2MjQ4MWRhNmQ5YzUiXSAudGItYnV0dG9uX19saW5rIHsgYmFja2dyb3VuZC1jb2xvcjogcmdiYSggMjA0LCA1OCwgMCwgMSApO2ZvbnQtd2VpZ2h0OiBib2xkOyB9ICN0YmNzcyAudGItYnV0dG9uW2RhdGEtdG9vbHNldC1ibG9ja3MtYnV0dG9uPSJmMDA4MTVjMTVhMTZhZDE4YzM0NjYyNDgxZGE2ZDljNSJdIC50Yi1idXR0b25fX2xpbms6aG92ZXIgeyBiYWNrZ3JvdW5kLWNvbG9yOiByZ2JhKCAyMDQsIDU4LCAwLCAxICk7IH0gI3RiY3NzIC50Yi1idXR0b25bZGF0YS10b29sc2V0LWJsb2Nrcy1idXR0b249ImYwMDgxNWMxNWExNmFkMThjMzQ2NjI0ODFkYTZkOWM1Il0gLnRiLWJ1dHRvbl9faWNvbiB7IGZvbnQtZmFtaWx5OiBkYXNoaWNvbnM7IH0gI3RiY3NzIGgzLnRiLWhlYWRpbmdbZGF0YS10b29sc2V0LWJsb2Nrcy1oZWFkaW5nPSIwYmE5ZTNkNTQ0OWM0MTE5MDhhZWM2MWEwZjk5MGJhYiJdICB7IHRleHQtYWxpZ246IGNlbnRlcjsgfSAgI3RiY3NzIGgzLnRiLWhlYWRpbmdbZGF0YS10b29sc2V0LWJsb2Nrcy1oZWFkaW5nPSIwYmE5ZTNkNTQ0OWM0MTE5MDhhZWM2MWEwZjk5MGJhYiJdIGEgIHsgdGV4dC1kZWNvcmF0aW9uOiBub25lOyB9IC50Yi1pbWFnZXtwb3NpdGlvbjpyZWxhdGl2ZTt0cmFuc2l0aW9uOnRyYW5zZm9ybSAwLjI1cyBlYXNlfS53cC1ibG9jay1pbWFnZSAudGItaW1hZ2UuYWxpZ25jZW50ZXJ7bWFyZ2luLWxlZnQ6YXV0bzttYXJnaW4tcmlnaHQ6YXV0b30udGItaW1hZ2UgaW1ne21heC13aWR0aDoxMDAlO2hlaWdodDphdXRvO3dpZHRoOmF1dG87dHJhbnNpdGlvbjp0cmFuc2Zvcm0gMC4yNXMgZWFzZX0udGItaW1hZ2UgLnRiLWltYWdlLWNhcHRpb24tZml0LXRvLWltYWdle2Rpc3BsYXk6dGFibGV9LnRiLWltYWdlIC50Yi1pbWFnZS1jYXB0aW9uLWZpdC10by1pbWFnZSAudGItaW1hZ2UtY2FwdGlvbntkaXNwbGF5OnRhYmxlLWNhcHRpb247Y2FwdGlvbi1zaWRlOmJvdHRvbX0gI3RiY3NzIC50Yi1pbWFnZVtkYXRhLXRvb2xzZXQtYmxvY2tzLWltYWdlPSIwZmUwNjkyMjg5ZTJhNThjZDYwZDVmYjYyNmE5MTI4MyJdIHsgbWF4LXdpZHRoOiAxMDAlOyB9ICN0YmNzcyAudGItaW1hZ2VbZGF0YS10b29sc2V0LWJsb2Nrcy1pbWFnZT0iMGZlMDY5MjI4OWUyYTU4Y2Q2MGQ1ZmI2MjZhOTEyODMiXSAudGItaW1hZ2Utc2hhZG93LTEtaW5uZXIgeyBib3JkZXI6IDBweCBzb2xpZCByZ2JhKCAwLCAwLCAwLCAwLjI1ICk7Ym9yZGVyLXJhZGl1czogMDsgfSAjdGJjc3MgLnRiLWltYWdlW2RhdGEtdG9vbHNldC1ibG9ja3MtaW1hZ2U9IjBmZTA2OTIyODllMmE1OGNkNjBkNWZiNjI2YTkxMjgzIl06aG92ZXIgeyB0cmFuc2Zvcm06IHJvdGF0ZSgwZGVnKSBzY2FsZSgxLjAyKTsgfSAudGItYnV0dG9ue2NvbG9yOiNmMWYxZjF9LnRiLWJ1dHRvbi0tbGVmdHt0ZXh0LWFsaWduOmxlZnR9LnRiLWJ1dHRvbi0tY2VudGVye3RleHQtYWxpZ246Y2VudGVyfS50Yi1idXR0b24tLXJpZ2h0e3RleHQtYWxpZ246cmlnaHR9LnRiLWJ1dHRvbl9fbGlua3tjb2xvcjppbmhlcml0O2N1cnNvcjpwb2ludGVyO2Rpc3BsYXk6aW5saW5lLWJsb2NrO2xpbmUtaGVpZ2h0OjEwMCU7dGV4dC1kZWNvcmF0aW9uOm5vbmUgIWltcG9ydGFudDt0ZXh0LWFsaWduOmNlbnRlcjt0cmFuc2l0aW9uOmFsbCAwLjNzIGVhc2V9LnRiLWJ1dHRvbl9fbGluazpob3ZlciwudGItYnV0dG9uX19saW5rOmZvY3VzLC50Yi1idXR0b25fX2xpbms6dmlzaXRlZHtjb2xvcjppbmhlcml0fS50Yi1idXR0b25fX2xpbms6aG92ZXIgLnRiLWJ1dHRvbl9fY29udGVudCwudGItYnV0dG9uX19saW5rOmZvY3VzIC50Yi1idXR0b25fX2NvbnRlbnQsLnRiLWJ1dHRvbl9fbGluazp2aXNpdGVkIC50Yi1idXR0b25fX2NvbnRlbnR7Zm9udC1mYW1pbHk6aW5oZXJpdDtmb250LXN0eWxlOmluaGVyaXQ7Zm9udC13ZWlnaHQ6aW5oZXJpdDtsZXR0ZXItc3BhY2luZzppbmhlcml0O3RleHQtZGVjb3JhdGlvbjppbmhlcml0O3RleHQtc2hhZG93OmluaGVyaXQ7dGV4dC10cmFuc2Zvcm06aW5oZXJpdH0udGItYnV0dG9uX19jb250ZW50e3ZlcnRpY2FsLWFsaWduOm1pZGRsZTt0cmFuc2l0aW9uOmFsbCAwLjNzIGVhc2V9LnRiLWJ1dHRvbl9faWNvbnt0cmFuc2l0aW9uOmFsbCAwLjNzIGVhc2U7ZGlzcGxheTppbmxpbmUtYmxvY2s7dmVydGljYWwtYWxpZ246bWlkZGxlO2ZvbnQtc3R5bGU6bm9ybWFsICFpbXBvcnRhbnR9LnRiLWJ1dHRvbl9faWNvbjo6YmVmb3Jle2NvbnRlbnQ6YXR0cihkYXRhLWZvbnQtY29kZSk7Zm9udC13ZWlnaHQ6bm9ybWFsICFpbXBvcnRhbnR9LnRiLWJ1dHRvbl9fbGlua3tiYWNrZ3JvdW5kLWNvbG9yOiM0NDQ7Ym9yZGVyLXJhZGl1czowLjNlbTtmb250LXNpemU6MS4zZW07bWFyZ2luLWJvdHRvbTowLjc2ZW07cGFkZGluZzowLjU1ZW0gMS41ZW0gMC41NWVtfSAjdGJjc3MgLnRiLWJ1dHRvbltkYXRhLXRvb2xzZXQtYmxvY2tzLWJ1dHRvbj0iMzk4MjBiNGNhYTI2MmE0ODQ4MmNkOGY1ODdlODQ1ZmUiXSB7IHRleHQtYWxpZ246IGNlbnRlcjsgfSAjdGJjc3MgLnRiLWJ1dHRvbltkYXRhLXRvb2xzZXQtYmxvY2tzLWJ1dHRvbj0iMzk4MjBiNGNhYTI2MmE0ODQ4MmNkOGY1ODdlODQ1ZmUiXSAudGItYnV0dG9uX19saW5rIHsgYmFja2dyb3VuZC1jb2xvcjogcmdiYSggMjA0LCA1OCwgMCwgMSApO2ZvbnQtd2VpZ2h0OiBib2xkOyB9ICN0YmNzcyAudGItYnV0dG9uW2RhdGEtdG9vbHNldC1ibG9ja3MtYnV0dG9uPSIzOTgyMGI0Y2FhMjYyYTQ4NDgyY2Q4ZjU4N2U4NDVmZSJdIC50Yi1idXR0b25fX2xpbms6aG92ZXIgeyBiYWNrZ3JvdW5kLWNvbG9yOiByZ2JhKCAyMDQsIDU4LCAwLCAxICk7IH0gI3RiY3NzIC50Yi1idXR0b25bZGF0YS10b29sc2V0LWJsb2Nrcy1idXR0b249IjM5ODIwYjRjYWEyNjJhNDg0ODJjZDhmNTg3ZTg0NWZlIl0gLnRiLWJ1dHRvbl9faWNvbiB7IGZvbnQtZmFtaWx5OiBkYXNoaWNvbnM7IH0gLnRiLWltYWdle3Bvc2l0aW9uOnJlbGF0aXZlO3RyYW5zaXRpb246dHJhbnNmb3JtIDAuMjVzIGVhc2V9LndwLWJsb2NrLWltYWdlIC50Yi1pbWFnZS5hbGlnbmNlbnRlcnttYXJnaW4tbGVmdDphdXRvO21hcmdpbi1yaWdodDphdXRvfS50Yi1pbWFnZSBpbWd7bWF4LXdpZHRoOjEwMCU7aGVpZ2h0OmF1dG87d2lkdGg6YXV0bzt0cmFuc2l0aW9uOnRyYW5zZm9ybSAwLjI1cyBlYXNlfS50Yi1pbWFnZSAudGItaW1hZ2UtY2FwdGlvbi1maXQtdG8taW1hZ2V7ZGlzcGxheTp0YWJsZX0udGItaW1hZ2UgLnRiLWltYWdlLWNhcHRpb24tZml0LXRvLWltYWdlIC50Yi1pbWFnZS1jYXB0aW9ue2Rpc3BsYXk6dGFibGUtY2FwdGlvbjtjYXB0aW9uLXNpZGU6Ym90dG9tfSAjdGJjc3MgLnRiLWltYWdlW2RhdGEtdG9vbHNldC1ibG9ja3MtaW1hZ2U9IjNlMTQxNzNlYmQyYjA1YWEzOGFmZWJkZDlhNDgyOWI5Il0geyBtYXgtd2lkdGg6IDEwMCU7IH0gI3RiY3NzIC50Yi1pbWFnZVtkYXRhLXRvb2xzZXQtYmxvY2tzLWltYWdlPSIzZTE0MTczZWJkMmIwNWFhMzhhZmViZGQ5YTQ4MjliOSJdIC50Yi1pbWFnZS1zaGFkb3ctMS1pbm5lciB7IGJvcmRlcjogMHB4IHNvbGlkIHJnYmEoIDAsIDAsIDAsIDAuMjUgKTtib3JkZXItcmFkaXVzOiAwOyB9ICN0YmNzcyAudGItaW1hZ2VbZGF0YS10b29sc2V0LWJsb2Nrcy1pbWFnZT0iM2UxNDE3M2ViZDJiMDVhYTM4YWZlYmRkOWE0ODI5YjkiXTpob3ZlciB7IHRyYW5zZm9ybTogcm90YXRlKDBkZWcpIHNjYWxlKDEuMDIpOyB9ICN0YmNzcyAud3AtYmxvY2stdG9vbHNldC1ibG9ja3MtZ3JpZC1jb2x1bW4udGItZ3JpZC1jb2x1bW5bZGF0YS10b29sc2V0LWJsb2Nrcy1ncmlkLWNvbHVtbj0iNjE0M2ViYjhhM2RkZTZjNjdjOGI3YTA0NzE2NmY2M2YiXSB7IGJhY2tncm91bmQtY29sb3I6IHJnYmEoIDIyMywgMjIxLCAyMTcsIDEgKTtib3JkZXItcmFkaXVzOiA5cHg7cGFkZGluZzogMjRweDtkaXNwbGF5OiBmbGV4OyB9IC50Yi1idXR0b257Y29sb3I6I2YxZjFmMX0udGItYnV0dG9uLS1sZWZ0e3RleHQtYWxpZ246bGVmdH0udGItYnV0dG9uLS1jZW50ZXJ7dGV4dC1hbGlnbjpjZW50ZXJ9LnRiLWJ1dHRvbi0tcmlnaHR7dGV4dC1hbGlnbjpyaWdodH0udGItYnV0dG9uX19saW5re2NvbG9yOmluaGVyaXQ7Y3Vyc29yOnBvaW50ZXI7ZGlzcGxheTppbmxpbmUtYmxvY2s7bGluZS1oZWlnaHQ6MTAwJTt0ZXh0LWRlY29yYXRpb246bm9uZSAhaW1wb3J0YW50O3RleHQtYWxpZ246Y2VudGVyO3RyYW5zaXRpb246YWxsIDAuM3MgZWFzZX0udGItYnV0dG9uX19saW5rOmhvdmVyLC50Yi1idXR0b25fX2xpbms6Zm9jdXMsLnRiLWJ1dHRvbl9fbGluazp2aXNpdGVke2NvbG9yOmluaGVyaXR9LnRiLWJ1dHRvbl9fbGluazpob3ZlciAudGItYnV0dG9uX19jb250ZW50LC50Yi1idXR0b25fX2xpbms6Zm9jdXMgLnRiLWJ1dHRvbl9fY29udGVudCwudGItYnV0dG9uX19saW5rOnZpc2l0ZWQgLnRiLWJ1dHRvbl9fY29udGVudHtmb250LWZhbWlseTppbmhlcml0O2ZvbnQtc3R5bGU6aW5oZXJpdDtmb250LXdlaWdodDppbmhlcml0O2xldHRlci1zcGFjaW5nOmluaGVyaXQ7dGV4dC1kZWNvcmF0aW9uOmluaGVyaXQ7dGV4dC1zaGFkb3c6aW5oZXJpdDt0ZXh0LXRyYW5zZm9ybTppbmhlcml0fS50Yi1idXR0b25fX2NvbnRlbnR7dmVydGljYWwtYWxpZ246bWlkZGxlO3RyYW5zaXRpb246YWxsIDAuM3MgZWFzZX0udGItYnV0dG9uX19pY29ue3RyYW5zaXRpb246YWxsIDAuM3MgZWFzZTtkaXNwbGF5OmlubGluZS1ibG9jazt2ZXJ0aWNhbC1hbGlnbjptaWRkbGU7Zm9udC1zdHlsZTpub3JtYWwgIWltcG9ydGFudH0udGItYnV0dG9uX19pY29uOjpiZWZvcmV7Y29udGVudDphdHRyKGRhdGEtZm9udC1jb2RlKTtmb250LXdlaWdodDpub3JtYWwgIWltcG9ydGFudH0udGItYnV0dG9uX19saW5re2JhY2tncm91bmQtY29sb3I6IzQ0NDtib3JkZXItcmFkaXVzOjAuM2VtO2ZvbnQtc2l6ZToxLjNlbTttYXJnaW4tYm90dG9tOjAuNzZlbTtwYWRkaW5nOjAuNTVlbSAxLjVlbSAwLjU1ZW19ICN0YmNzcyAudGItYnV0dG9uW2RhdGEtdG9vbHNldC1ibG9ja3MtYnV0dG9uPSJjYWI5YzVjZGRjOWRlYWU1NmQ3OTgxNGJkMDU2Y2QxOCJdIHsgdGV4dC1hbGlnbjogY2VudGVyOyB9ICN0YmNzcyAudGItYnV0dG9uW2RhdGEtdG9vbHNldC1ibG9ja3MtYnV0dG9uPSJjYWI5YzVjZGRjOWRlYWU1NmQ3OTgxNGJkMDU2Y2QxOCJdIC50Yi1idXR0b25fX2xpbmsgeyBiYWNrZ3JvdW5kLWNvbG9yOiByZ2JhKCAyMDQsIDU4LCAwLCAxICk7Zm9udC13ZWlnaHQ6IGJvbGQ7IH0gI3RiY3NzIC50Yi1idXR0b25bZGF0YS10b29sc2V0LWJsb2Nrcy1idXR0b249ImNhYjljNWNkZGM5ZGVhZTU2ZDc5ODE0YmQwNTZjZDE4Il0gLnRiLWJ1dHRvbl9fbGluazpob3ZlciB7IGJhY2tncm91bmQtY29sb3I6IHJnYmEoIDIwNCwgNTgsIDAsIDEgKTsgfSAjdGJjc3MgLnRiLWJ1dHRvbltkYXRhLXRvb2xzZXQtYmxvY2tzLWJ1dHRvbj0iY2FiOWM1Y2RkYzlkZWFlNTZkNzk4MTRiZDA1NmNkMTgiXSAudGItYnV0dG9uX19pY29uIHsgZm9udC1mYW1pbHk6IGRhc2hpY29uczsgfSAjdGJjc3MgaDMudGItaGVhZGluZ1tkYXRhLXRvb2xzZXQtYmxvY2tzLWhlYWRpbmc9IjZhZTk4MzJlNDViNTRlNjE0ZTI0NDFhMGMwYjE4YTdjIl0gIHsgdGV4dC1hbGlnbjogY2VudGVyOyB9ICAjdGJjc3MgaDMudGItaGVhZGluZ1tkYXRhLXRvb2xzZXQtYmxvY2tzLWhlYWRpbmc9IjZhZTk4MzJlNDViNTRlNjE0ZTI0NDFhMGMwYjE4YTdjIl0gYSAgeyB0ZXh0LWRlY29yYXRpb246IG5vbmU7IH0gLnRiLWltYWdle3Bvc2l0aW9uOnJlbGF0aXZlO3RyYW5zaXRpb246dHJhbnNmb3JtIDAuMjVzIGVhc2V9LndwLWJsb2NrLWltYWdlIC50Yi1pbWFnZS5hbGlnbmNlbnRlcnttYXJnaW4tbGVmdDphdXRvO21hcmdpbi1yaWdodDphdXRvfS50Yi1pbWFnZSBpbWd7bWF4LXdpZHRoOjEwMCU7aGVpZ2h0OmF1dG87d2lkdGg6YXV0bzt0cmFuc2l0aW9uOnRyYW5zZm9ybSAwLjI1cyBlYXNlfS50Yi1pbWFnZSAudGItaW1hZ2UtY2FwdGlvbi1maXQtdG8taW1hZ2V7ZGlzcGxheTp0YWJsZX0udGItaW1hZ2UgLnRiLWltYWdlLWNhcHRpb24tZml0LXRvLWltYWdlIC50Yi1pbWFnZS1jYXB0aW9ue2Rpc3BsYXk6dGFibGUtY2FwdGlvbjtjYXB0aW9uLXNpZGU6Ym90dG9tfSAjdGJjc3MgLnRiLWltYWdlW2RhdGEtdG9vbHNldC1ibG9ja3MtaW1hZ2U9ImYyMmY4MmZiMWY3NmQzZTkyN2MwY2YwOTRhYTYzYTJjIl0geyBtYXgtd2lkdGg6IDEwMCU7IH0gI3RiY3NzIC50Yi1pbWFnZVtkYXRhLXRvb2xzZXQtYmxvY2tzLWltYWdlPSJmMjJmODJmYjFmNzZkM2U5MjdjMGNmMDk0YWE2M2EyYyJdIC50Yi1pbWFnZS1zaGFkb3ctMS1pbm5lciB7IGJvcmRlcjogMHB4IHNvbGlkIHJnYmEoIDAsIDAsIDAsIDAuMjUgKTtib3JkZXItcmFkaXVzOiAwOyB9ICN0YmNzcyAudGItaW1hZ2VbZGF0YS10b29sc2V0LWJsb2Nrcy1pbWFnZT0iZjIyZjgyZmIxZjc2ZDNlOTI3YzBjZjA5NGFhNjNhMmMiXTpob3ZlciB7IHRyYW5zZm9ybTogcm90YXRlKDBkZWcpIHNjYWxlKDEuMDIpOyB9ICN0YmNzcyAudGItaGVhZGluZ1tkYXRhLXRvb2xzZXQtYmxvY2tzLWhlYWRpbmc9IjI2MGRhZDZkZjEzNmM2MzEwMTRmM2Y3YjJkZDQ2MmQ5Il0gIHsgZm9udC1zaXplOiAyNHB4O2ZvbnQtd2VpZ2h0OiBub3JtYWw7dGV4dC1zaGFkb3c6IDJweCAzcHggNnB4IHJnYmEoIDAsIDAsIDAsIDEgKTtjb2xvcjogcmdiYSggMjMwLCAyMjUsIDIwOSwgMSApOyB9ICAjdGJjc3MgaDIudGItaGVhZGluZ1tkYXRhLXRvb2xzZXQtYmxvY2tzLWhlYWRpbmc9IjRjNjAyMWMyMThlOGRlNDFkYjc5OTlkYzI1NjczNTA5Il0gIHsgZm9udC1zaXplOiA2MHB4O3RleHQtc2hhZG93OiA1cHggNXB4IDEwcHggcmdiYSggMCwgMCwgMCwgMSApO2NvbG9yOiByZ2JhKCAyNTUsIDI1NSwgMjU1LCAxICk7bWFyZ2luLXRvcDogMjB2aDsgfSAgLnRiLWdyaWQsLnRiLWdyaWQ+LmJsb2NrLWVkaXRvci1pbm5lci1ibG9ja3M+LmJsb2NrLWVkaXRvci1ibG9jay1saXN0X19sYXlvdXR7ZGlzcGxheTpncmlkO2dyaWQtcm93LWdhcDoyNXB4O2dyaWQtY29sdW1uLWdhcDoyNXB4fS50Yi1ncmlkLWl0ZW17YmFja2dyb3VuZDojZDM4YTAzO3BhZGRpbmc6MzBweH0udGItZ3JpZC1jb2x1bW57ZmxleC13cmFwOndyYXB9LnRiLWdyaWQtY29sdW1uPip7d2lkdGg6MTAwJX0udGItZ3JpZC1jb2x1bW4udGItZ3JpZC1hbGlnbi10b3B7d2lkdGg6MTAwJTtkaXNwbGF5OmZsZXg7YWxpZ24tY29udGVudDpmbGV4LXN0YXJ0fS50Yi1ncmlkLWNvbHVtbi50Yi1ncmlkLWFsaWduLWNlbnRlcnt3aWR0aDoxMDAlO2Rpc3BsYXk6ZmxleDthbGlnbi1jb250ZW50OmNlbnRlcn0udGItZ3JpZC1jb2x1bW4udGItZ3JpZC1hbGlnbi1ib3R0b217d2lkdGg6MTAwJTtkaXNwbGF5OmZsZXg7YWxpZ24tY29udGVudDpmbGV4LWVuZH0gI3RiY3NzIC53cC1ibG9jay10b29sc2V0LWJsb2Nrcy1ncmlkLnRiLWdyaWRbZGF0YS10b29sc2V0LWJsb2Nrcy1ncmlkPSJmYjY4ZTlhODczODY3YjM2ZDVjMTNjMDEwMDU2NDhlMiJdIHsgZ3JpZC10ZW1wbGF0ZS1jb2x1bW5zOiBtaW5tYXgoMCwgMC4zMzMzZnIpIG1pbm1heCgwLCAwLjMzMzNmcikgbWlubWF4KDAsIDAuMzMzM2ZyKTtncmlkLWF1dG8tZmxvdzogcm93IH0gI3RiY3NzIC53cC1ibG9jay10b29sc2V0LWJsb2Nrcy1ncmlkLnRiLWdyaWRbZGF0YS10b29sc2V0LWJsb2Nrcy1ncmlkPSJmYjY4ZTlhODczODY3YjM2ZDVjMTNjMDEwMDU2NDhlMiJdID4gLnRiLWdyaWQtY29sdW1uOm50aC1vZi10eXBlKDNuICsgMSkgeyBncmlkLWNvbHVtbjogMSB9ICN0YmNzcyAud3AtYmxvY2stdG9vbHNldC1ibG9ja3MtZ3JpZC50Yi1ncmlkW2RhdGEtdG9vbHNldC1ibG9ja3MtZ3JpZD0iZmI2OGU5YTg3Mzg2N2IzNmQ1YzEzYzAxMDA1NjQ4ZTIiXSA+IC50Yi1ncmlkLWNvbHVtbjpudGgtb2YtdHlwZSgzbiArIDIpIHsgZ3JpZC1jb2x1bW46IDIgfSAjdGJjc3MgLndwLWJsb2NrLXRvb2xzZXQtYmxvY2tzLWdyaWQudGItZ3JpZFtkYXRhLXRvb2xzZXQtYmxvY2tzLWdyaWQ9ImZiNjhlOWE4NzM4NjdiMzZkNWMxM2MwMTAwNTY0OGUyIl0gPiAudGItZ3JpZC1jb2x1bW46bnRoLW9mLXR5cGUoM24gKyAzKSB7IGdyaWQtY29sdW1uOiAzIH0gI3RiY3NzIC53cC1ibG9jay10b29sc2V0LWJsb2Nrcy1ncmlkLWNvbHVtbi50Yi1ncmlkLWNvbHVtbltkYXRhLXRvb2xzZXQtYmxvY2tzLWdyaWQtY29sdW1uPSIzMDM0ZmJlODg2YzExMDU0ZTk1YjQ2YjA5ZDNlNDExMiJdIHsgZGlzcGxheTogZmxleDsgfSAudGItaW1hZ2V7cG9zaXRpb246cmVsYXRpdmU7dHJhbnNpdGlvbjp0cmFuc2Zvcm0gMC4yNXMgZWFzZX0ud3AtYmxvY2staW1hZ2UgLnRiLWltYWdlLmFsaWduY2VudGVye21hcmdpbi1sZWZ0OmF1dG87bWFyZ2luLXJpZ2h0OmF1dG99LnRiLWltYWdlIGltZ3ttYXgtd2lkdGg6MTAwJTtoZWlnaHQ6YXV0bzt3aWR0aDphdXRvO3RyYW5zaXRpb246dHJhbnNmb3JtIDAuMjVzIGVhc2V9LnRiLWltYWdlIC50Yi1pbWFnZS1jYXB0aW9uLWZpdC10by1pbWFnZXtkaXNwbGF5OnRhYmxlfS50Yi1pbWFnZSAudGItaW1hZ2UtY2FwdGlvbi1maXQtdG8taW1hZ2UgLnRiLWltYWdlLWNhcHRpb257ZGlzcGxheTp0YWJsZS1jYXB0aW9uO2NhcHRpb24tc2lkZTpib3R0b219ICN0YmNzcyAudGItaW1hZ2VbZGF0YS10b29sc2V0LWJsb2Nrcy1pbWFnZT0iYzE1N2JiMWFiMmNjOTUzOWJlMmM2MzdiMTY0MzU2ZDMiXSB7IG1heC13aWR0aDogMTAwJTt0cmFuc2Zvcm06IHJvdGF0ZSgwZGVnKTsgfSAjdGJjc3MgLnRiLWltYWdlW2RhdGEtdG9vbHNldC1ibG9ja3MtaW1hZ2U9ImMxNTdiYjFhYjJjYzk1MzliZTJjNjM3YjE2NDM1NmQzIl0gLnRiLWltYWdlLXNoYWRvdy0xLWlubmVyIHsgYm9yZGVyOiAwcHggc29saWQgcmdiYSggMjU1LCAyNTUsIDI1NSwgMSApO2JvcmRlci1yYWRpdXM6IDA7IH0gI3RiY3NzIC50Yi1pbWFnZVtkYXRhLXRvb2xzZXQtYmxvY2tzLWltYWdlPSJjMTU3YmIxYWIyY2M5NTM5YmUyYzYzN2IxNjQzNTZkMyJdOmhvdmVyIHsgdHJhbnNmb3JtOiByb3RhdGUoMGRlZykgc2NhbGUoMS4wMik7IH0gLnRiLWltYWdle3Bvc2l0aW9uOnJlbGF0aXZlO3RyYW5zaXRpb246dHJhbnNmb3JtIDAuMjVzIGVhc2V9LndwLWJsb2NrLWltYWdlIC50Yi1pbWFnZS5hbGlnbmNlbnRlcnttYXJnaW4tbGVmdDphdXRvO21hcmdpbi1yaWdodDphdXRvfS50Yi1pbWFnZSBpbWd7bWF4LXdpZHRoOjEwMCU7aGVpZ2h0OmF1dG87d2lkdGg6YXV0bzt0cmFuc2l0aW9uOnRyYW5zZm9ybSAwLjI1cyBlYXNlfS50Yi1pbWFnZSAudGItaW1hZ2UtY2FwdGlvbi1maXQtdG8taW1hZ2V7ZGlzcGxheTp0YWJsZX0udGItaW1hZ2UgLnRiLWltYWdlLWNhcHRpb24tZml0LXRvLWltYWdlIC50Yi1pbWFnZS1jYXB0aW9ue2Rpc3BsYXk6dGFibGUtY2FwdGlvbjtjYXB0aW9uLXNpZGU6Ym90dG9tfSAjdGJjc3MgLndwLWJsb2NrLWltYWdlLnRiLWltYWdlW2RhdGEtdG9vbHNldC1ibG9ja3MtaW1hZ2U9IjVkYWE1N2VjNDg3Y2QzM2U4NDdmYTI5MGQxM2Q5ZThmIl0geyBtYXgtd2lkdGg6IDEwMCU7IH0gLnRiLWltYWdle3Bvc2l0aW9uOnJlbGF0aXZlO3RyYW5zaXRpb246dHJhbnNmb3JtIDAuMjVzIGVhc2V9LndwLWJsb2NrLWltYWdlIC50Yi1pbWFnZS5hbGlnbmNlbnRlcnttYXJnaW4tbGVmdDphdXRvO21hcmdpbi1yaWdodDphdXRvfS50Yi1pbWFnZSBpbWd7bWF4LXdpZHRoOjEwMCU7aGVpZ2h0OmF1dG87d2lkdGg6YXV0bzt0cmFuc2l0aW9uOnRyYW5zZm9ybSAwLjI1cyBlYXNlfS50Yi1pbWFnZSAudGItaW1hZ2UtY2FwdGlvbi1maXQtdG8taW1hZ2V7ZGlzcGxheTp0YWJsZX0udGItaW1hZ2UgLnRiLWltYWdlLWNhcHRpb24tZml0LXRvLWltYWdlIC50Yi1pbWFnZS1jYXB0aW9ue2Rpc3BsYXk6dGFibGUtY2FwdGlvbjtjYXB0aW9uLXNpZGU6Ym90dG9tfSAjdGJjc3MgLnRiLWltYWdlW2RhdGEtdG9vbHNldC1ibG9ja3MtaW1hZ2U9IjVhZWM3YzY1NGU4YzY5MjA5ODRhZTdiMjkyYWFiZTBlIl0geyBtYXgtd2lkdGg6IDEwMCU7dHJhbnNmb3JtOiByb3RhdGUoMGRlZyk7IH0gI3RiY3NzIC50Yi1pbWFnZVtkYXRhLXRvb2xzZXQtYmxvY2tzLWltYWdlPSI1YWVjN2M2NTRlOGM2OTIwOTg0YWU3YjI5MmFhYmUwZSJdIC50Yi1pbWFnZS1zaGFkb3ctMS1pbm5lciB7IGJvcmRlcjogMHB4IHNvbGlkIHJnYmEoIDI1NSwgMjU1LCAyNTUsIDEgKTtib3JkZXItcmFkaXVzOiAwOyB9ICN0YmNzcyAudGItaW1hZ2VbZGF0YS10b29sc2V0LWJsb2Nrcy1pbWFnZT0iNWFlYzdjNjU0ZThjNjkyMDk4NGFlN2IyOTJhYWJlMGUiXTpob3ZlciB7IHRyYW5zZm9ybTogcm90YXRlKDBkZWcpIHNjYWxlKDEuMDIpOyB9IC50Yi1ncmlkLC50Yi1ncmlkPi5ibG9jay1lZGl0b3ItaW5uZXItYmxvY2tzPi5ibG9jay1lZGl0b3ItYmxvY2stbGlzdF9fbGF5b3V0e2Rpc3BsYXk6Z3JpZDtncmlkLXJvdy1nYXA6MjVweDtncmlkLWNvbHVtbi1nYXA6MjVweH0udGItZ3JpZC1pdGVte2JhY2tncm91bmQ6I2QzOGEwMztwYWRkaW5nOjMwcHh9LnRiLWdyaWQtY29sdW1ue2ZsZXgtd3JhcDp3cmFwfS50Yi1ncmlkLWNvbHVtbj4qe3dpZHRoOjEwMCV9LnRiLWdyaWQtY29sdW1uLnRiLWdyaWQtYWxpZ24tdG9we3dpZHRoOjEwMCU7ZGlzcGxheTpmbGV4O2FsaWduLWNvbnRlbnQ6ZmxleC1zdGFydH0udGItZ3JpZC1jb2x1bW4udGItZ3JpZC1hbGlnbi1jZW50ZXJ7d2lkdGg6MTAwJTtkaXNwbGF5OmZsZXg7YWxpZ24tY29udGVudDpjZW50ZXJ9LnRiLWdyaWQtY29sdW1uLnRiLWdyaWQtYWxpZ24tYm90dG9te3dpZHRoOjEwMCU7ZGlzcGxheTpmbGV4O2FsaWduLWNvbnRlbnQ6ZmxleC1lbmR9ICN0YmNzcyAud3AtYmxvY2stdG9vbHNldC1ibG9ja3MtZ3JpZC50Yi1ncmlkW2RhdGEtdG9vbHNldC1ibG9ja3MtZ3JpZD0iZjIyMmYzNTkyNmMyMDZlZjgxMjIwZGFjNjc5NDUzNjUiXSB7IGJhY2tncm91bmQtY29sb3I6IHJnYmEoIDIyMywgMjIxLCAyMTcsIDEgKTtib3JkZXItcmFkaXVzOiAxNnB4O3BhZGRpbmc6IDQ4cHggMjRweCA0OHB4IDI0cHg7Ym94LXNoYWRvdzogNXB4IDVweCAxMHB4IDAgcmdiYSggMCwgMCwgMCwgMC41ICk7Z3JpZC10ZW1wbGF0ZS1jb2x1bW5zOiBtaW5tYXgoMCwgMC41MWZyKSBtaW5tYXgoMCwgMC40OWZyKTtncmlkLWF1dG8tZmxvdzogcm93IH0gI3RiY3NzIC53cC1ibG9jay10b29sc2V0LWJsb2Nrcy1ncmlkLnRiLWdyaWRbZGF0YS10b29sc2V0LWJsb2Nrcy1ncmlkPSJmMjIyZjM1OTI2YzIwNmVmODEyMjBkYWM2Nzk0NTM2NSJdID4gLnRiLWdyaWQtY29sdW1uOm50aC1vZi10eXBlKDJuICsgMSkgeyBncmlkLWNvbHVtbjogMSB9ICN0YmNzcyAud3AtYmxvY2stdG9vbHNldC1ibG9ja3MtZ3JpZC50Yi1ncmlkW2RhdGEtdG9vbHNldC1ibG9ja3MtZ3JpZD0iZjIyMmYzNTkyNmMyMDZlZjgxMjIwZGFjNjc5NDUzNjUiXSA+IC50Yi1ncmlkLWNvbHVtbjpudGgtb2YtdHlwZSgybiArIDIpIHsgZ3JpZC1jb2x1bW46IDIgfSAjdGJjc3MgLnRiLWhlYWRpbmdbZGF0YS10b29sc2V0LWJsb2Nrcy1oZWFkaW5nPSJhMjk5YTE5NDQ1MmEyODVmMWJlMjJjNjRjOTdhNmQyMyJdICB7IGZvbnQtc2l6ZTogMjBweDtmb250LXdlaWdodDogYm9sZDsgfSAgI3RiY3NzIC50Yi1oZWFkaW5nW2RhdGEtdG9vbHNldC1ibG9ja3MtaGVhZGluZz0iYWJiYjI0OGQxMjI1NmJlOTU2ZWVkZmU3MjFlZWIyZWYiXSAgeyBmb250LXNpemU6IDMwcHg7Zm9udC13ZWlnaHQ6IGJvbGQ7Y29sb3I6IHJnYmEoIDIwNCwgNTgsIDAsIDEgKTsgfSAgI3RiY3NzIC50Yi1oZWFkaW5nW2RhdGEtdG9vbHNldC1ibG9ja3MtaGVhZGluZz0iYWJiYjI0OGQxMjI1NmJlOTU2ZWVkZmU3MjFlZWIyZWYiXSBhICB7IGNvbG9yOiByZ2JhKCAyMTYsIDY0LCAzLCAxICk7dGV4dC1kZWNvcmF0aW9uOiBub25lOyB9IC50Yi1pbWFnZXtwb3NpdGlvbjpyZWxhdGl2ZTt0cmFuc2l0aW9uOnRyYW5zZm9ybSAwLjI1cyBlYXNlfS53cC1ibG9jay1pbWFnZSAudGItaW1hZ2UuYWxpZ25jZW50ZXJ7bWFyZ2luLWxlZnQ6YXV0bzttYXJnaW4tcmlnaHQ6YXV0b30udGItaW1hZ2UgaW1ne21heC13aWR0aDoxMDAlO2hlaWdodDphdXRvO3dpZHRoOmF1dG87dHJhbnNpdGlvbjp0cmFuc2Zvcm0gMC4yNXMgZWFzZX0udGItaW1hZ2UgLnRiLWltYWdlLWNhcHRpb24tZml0LXRvLWltYWdle2Rpc3BsYXk6dGFibGV9LnRiLWltYWdlIC50Yi1pbWFnZS1jYXB0aW9uLWZpdC10by1pbWFnZSAudGItaW1hZ2UtY2FwdGlvbntkaXNwbGF5OnRhYmxlLWNhcHRpb247Y2FwdGlvbi1zaWRlOmJvdHRvbX0gI3RiY3NzIC50Yi1pbWFnZVtkYXRhLXRvb2xzZXQtYmxvY2tzLWltYWdlPSI4Y2I4MTA4MWMyNTY0OWY2ODc2MGI1ZTYzZmZlNGU0NSJdIHsgbWF4LXdpZHRoOiAxMDAlO3RyYW5zZm9ybTogcm90YXRlKDBkZWcpOyB9ICN0YmNzcyAudGItaW1hZ2VbZGF0YS10b29sc2V0LWJsb2Nrcy1pbWFnZT0iOGNiODEwODFjMjU2NDlmNjg3NjBiNWU2M2ZmZTRlNDUiXSAudGItaW1hZ2Utc2hhZG93LTEtaW5uZXIgeyBib3JkZXI6IDBweCBzb2xpZCByZ2JhKCAyNTUsIDI1NSwgMjU1LCAxICk7Ym9yZGVyLXJhZGl1czogMDsgfSAjdGJjc3MgLnRiLWltYWdlW2RhdGEtdG9vbHNldC1ibG9ja3MtaW1hZ2U9IjhjYjgxMDgxYzI1NjQ5ZjY4NzYwYjVlNjNmZmU0ZTQ1Il06aG92ZXIgeyB0cmFuc2Zvcm06IHJvdGF0ZSgwZGVnKSBzY2FsZSgxLjAyKTsgfSAudGItaW1hZ2V7cG9zaXRpb246cmVsYXRpdmU7dHJhbnNpdGlvbjp0cmFuc2Zvcm0gMC4yNXMgZWFzZX0ud3AtYmxvY2staW1hZ2UgLnRiLWltYWdlLmFsaWduY2VudGVye21hcmdpbi1sZWZ0OmF1dG87bWFyZ2luLXJpZ2h0OmF1dG99LnRiLWltYWdlIGltZ3ttYXgtd2lkdGg6MTAwJTtoZWlnaHQ6YXV0bzt3aWR0aDphdXRvO3RyYW5zaXRpb246dHJhbnNmb3JtIDAuMjVzIGVhc2V9LnRiLWltYWdlIC50Yi1pbWFnZS1jYXB0aW9uLWZpdC10by1pbWFnZXtkaXNwbGF5OnRhYmxlfS50Yi1pbWFnZSAudGItaW1hZ2UtY2FwdGlvbi1maXQtdG8taW1hZ2UgLnRiLWltYWdlLWNhcHRpb257ZGlzcGxheTp0YWJsZS1jYXB0aW9uO2NhcHRpb24tc2lkZTpib3R0b219ICN0YmNzcyAud3AtYmxvY2staW1hZ2UudGItaW1hZ2VbZGF0YS10b29sc2V0LWJsb2Nrcy1pbWFnZT0iOGQ0NmUzZGZmMGE0Y2FmOTgyMzA5OWZhMTA0MDdkNDkiXSB7IG1heC13aWR0aDogMTAwJTsgfSAjdGJjc3MgLndwLWJsb2NrLWltYWdlLnRiLWltYWdlW2RhdGEtdG9vbHNldC1ibG9ja3MtaW1hZ2U9IjhkNDZlM2RmZjBhNGNhZjk4MjMwOTlmYTEwNDA3ZDQ5Il0gaW1nIHsgbWFyZ2luLWJvdHRvbTogNDhweDsgfSAgLnRiLWdyaWQsLnRiLWdyaWQ+LmJsb2NrLWVkaXRvci1pbm5lci1ibG9ja3M+LmJsb2NrLWVkaXRvci1ibG9jay1saXN0X19sYXlvdXR7ZGlzcGxheTpncmlkO2dyaWQtcm93LWdhcDoyNXB4O2dyaWQtY29sdW1uLWdhcDoyNXB4fS50Yi1ncmlkLWl0ZW17YmFja2dyb3VuZDojZDM4YTAzO3BhZGRpbmc6MzBweH0udGItZ3JpZC1jb2x1bW57ZmxleC13cmFwOndyYXB9LnRiLWdyaWQtY29sdW1uPip7d2lkdGg6MTAwJX0udGItZ3JpZC1jb2x1bW4udGItZ3JpZC1hbGlnbi10b3B7d2lkdGg6MTAwJTtkaXNwbGF5OmZsZXg7YWxpZ24tY29udGVudDpmbGV4LXN0YXJ0fS50Yi1ncmlkLWNvbHVtbi50Yi1ncmlkLWFsaWduLWNlbnRlcnt3aWR0aDoxMDAlO2Rpc3BsYXk6ZmxleDthbGlnbi1jb250ZW50OmNlbnRlcn0udGItZ3JpZC1jb2x1bW4udGItZ3JpZC1hbGlnbi1ib3R0b217d2lkdGg6MTAwJTtkaXNwbGF5OmZsZXg7YWxpZ24tY29udGVudDpmbGV4LWVuZH0gI3RiY3NzIC53cC1ibG9jay10b29sc2V0LWJsb2Nrcy1ncmlkLnRiLWdyaWRbZGF0YS10b29sc2V0LWJsb2Nrcy1ncmlkPSJkZGFmNmY1OTJmMTZkNmZhMGJhYTliZTcxNzE1OWE4NyJdIHsgYmFja2dyb3VuZC1jb2xvcjogcmdiYSggMjIzLCAyMjEsIDIxNywgMSApO2JvcmRlci1yYWRpdXM6IDE2cHg7cGFkZGluZzogNDhweCAyNHB4IDQ4cHggMjRweDtib3gtc2hhZG93OiA1cHggNXB4IDEwcHggMCByZ2JhKCAwLCAwLCAwLCAwLjUgKTtncmlkLXRlbXBsYXRlLWNvbHVtbnM6IG1pbm1heCgwLCAwLjUxZnIpIG1pbm1heCgwLCAwLjQ5ZnIpO2dyaWQtYXV0by1mbG93OiByb3cgfSAjdGJjc3MgLndwLWJsb2NrLXRvb2xzZXQtYmxvY2tzLWdyaWQudGItZ3JpZFtkYXRhLXRvb2xzZXQtYmxvY2tzLWdyaWQ9ImRkYWY2ZjU5MmYxNmQ2ZmEwYmFhOWJlNzE3MTU5YTg3Il0gPiAudGItZ3JpZC1jb2x1bW46bnRoLW9mLXR5cGUoMm4gKyAxKSB7IGdyaWQtY29sdW1uOiAxIH0gI3RiY3NzIC53cC1ibG9jay10b29sc2V0LWJsb2Nrcy1ncmlkLnRiLWdyaWRbZGF0YS10b29sc2V0LWJsb2Nrcy1ncmlkPSJkZGFmNmY1OTJmMTZkNmZhMGJhYTliZTcxNzE1OWE4NyJdID4gLnRiLWdyaWQtY29sdW1uOm50aC1vZi10eXBlKDJuICsgMikgeyBncmlkLWNvbHVtbjogMiB9IC50Yi1idXR0b257Y29sb3I6I2YxZjFmMX0udGItYnV0dG9uLS1sZWZ0e3RleHQtYWxpZ246bGVmdH0udGItYnV0dG9uLS1jZW50ZXJ7dGV4dC1hbGlnbjpjZW50ZXJ9LnRiLWJ1dHRvbi0tcmlnaHR7dGV4dC1hbGlnbjpyaWdodH0udGItYnV0dG9uX19saW5re2NvbG9yOmluaGVyaXQ7Y3Vyc29yOnBvaW50ZXI7ZGlzcGxheTppbmxpbmUtYmxvY2s7bGluZS1oZWlnaHQ6MTAwJTt0ZXh0LWRlY29yYXRpb246bm9uZSAhaW1wb3J0YW50O3RleHQtYWxpZ246Y2VudGVyO3RyYW5zaXRpb246YWxsIDAuM3MgZWFzZX0udGItYnV0dG9uX19saW5rOmhvdmVyLC50Yi1idXR0b25fX2xpbms6Zm9jdXMsLnRiLWJ1dHRvbl9fbGluazp2aXNpdGVke2NvbG9yOmluaGVyaXR9LnRiLWJ1dHRvbl9fbGluazpob3ZlciAudGItYnV0dG9uX19jb250ZW50LC50Yi1idXR0b25fX2xpbms6Zm9jdXMgLnRiLWJ1dHRvbl9fY29udGVudCwudGItYnV0dG9uX19saW5rOnZpc2l0ZWQgLnRiLWJ1dHRvbl9fY29udGVudHtmb250LWZhbWlseTppbmhlcml0O2ZvbnQtc3R5bGU6aW5oZXJpdDtmb250LXdlaWdodDppbmhlcml0O2xldHRlci1zcGFjaW5nOmluaGVyaXQ7dGV4dC1kZWNvcmF0aW9uOmluaGVyaXQ7dGV4dC1zaGFkb3c6aW5oZXJpdDt0ZXh0LXRyYW5zZm9ybTppbmhlcml0fS50Yi1idXR0b25fX2NvbnRlbnR7dmVydGljYWwtYWxpZ246bWlkZGxlO3RyYW5zaXRpb246YWxsIDAuM3MgZWFzZX0udGItYnV0dG9uX19pY29ue3RyYW5zaXRpb246YWxsIDAuM3MgZWFzZTtkaXNwbGF5OmlubGluZS1ibG9jazt2ZXJ0aWNhbC1hbGlnbjptaWRkbGU7Zm9udC1zdHlsZTpub3JtYWwgIWltcG9ydGFudH0udGItYnV0dG9uX19pY29uOjpiZWZvcmV7Y29udGVudDphdHRyKGRhdGEtZm9udC1jb2RlKTtmb250LXdlaWdodDpub3JtYWwgIWltcG9ydGFudH0udGItYnV0dG9uX19saW5re2JhY2tncm91bmQtY29sb3I6IzQ0NDtib3JkZXItcmFkaXVzOjAuM2VtO2ZvbnQtc2l6ZToxLjNlbTttYXJnaW4tYm90dG9tOjAuNzZlbTtwYWRkaW5nOjAuNTVlbSAxLjVlbSAwLjU1ZW19ICN0YmNzcyAudGItYnV0dG9uW2RhdGEtdG9vbHNldC1ibG9ja3MtYnV0dG9uPSJlMDA4MThmYWFjYTU2MjEyYmEyNWQ2ZTIxNmRjOTMzYSJdIC50Yi1idXR0b25fX2xpbmsgeyBiYWNrZ3JvdW5kLWNvbG9yOiByZ2JhKCAyMDQsIDU4LCAwLCAxICk7IH0gI3RiY3NzIC50Yi1idXR0b25bZGF0YS10b29sc2V0LWJsb2Nrcy1idXR0b249ImUwMDgxOGZhYWNhNTYyMTJiYTI1ZDZlMjE2ZGM5MzNhIl0gLnRiLWJ1dHRvbl9fbGluazpob3ZlciB7IGJhY2tncm91bmQtY29sb3I6IHJnYmEoIDIwNCwgNTgsIDAsIDEgKTsgfSAjdGJjc3MgLnRiLWJ1dHRvbltkYXRhLXRvb2xzZXQtYmxvY2tzLWJ1dHRvbj0iZTAwODE4ZmFhY2E1NjIxMmJhMjVkNmUyMTZkYzkzM2EiXSAudGItYnV0dG9uX19pY29uIHsgZm9udC1mYW1pbHk6IGRhc2hpY29uczsgfSAgI3RiY3NzIC50Yi1oZWFkaW5nW2RhdGEtdG9vbHNldC1ibG9ja3MtaGVhZGluZz0iMmI1ZjZlZjY2YjIwM2QzYzgzNjNmY2IwYWE1MmRiYTciXSAgeyBmb250LXNpemU6IDMwcHg7Zm9udC13ZWlnaHQ6IGJvbGQ7IH0gICN0YmNzcyAudGItaGVhZGluZ1tkYXRhLXRvb2xzZXQtYmxvY2tzLWhlYWRpbmc9IjJiNWY2ZWY2NmIyMDNkM2M4MzYzZmNiMGFhNTJkYmE3Il0gYSAgeyBjb2xvcjogcmdiYSggMjE2LCA2NCwgMywgMSApO3RleHQtZGVjb3JhdGlvbjogbm9uZTsgfSAjdGJjc3MgLndwLWJsb2NrLXRvb2xzZXQtYmxvY2tzLWdyaWQtY29sdW1uLnRiLWdyaWQtY29sdW1uW2RhdGEtdG9vbHNldC1ibG9ja3MtZ3JpZC1jb2x1bW49ImY1ODZmZjdiZmUxZDczMTdjNjMxNjJlYzdiNzAzOWVkIl0geyBkaXNwbGF5OiBmbGV4OyB9IC50Yi1pbWFnZXtwb3NpdGlvbjpyZWxhdGl2ZTt0cmFuc2l0aW9uOnRyYW5zZm9ybSAwLjI1cyBlYXNlfS53cC1ibG9jay1pbWFnZSAudGItaW1hZ2UuYWxpZ25jZW50ZXJ7bWFyZ2luLWxlZnQ6YXV0bzttYXJnaW4tcmlnaHQ6YXV0b30udGItaW1hZ2UgaW1ne21heC13aWR0aDoxMDAlO2hlaWdodDphdXRvO3dpZHRoOmF1dG87dHJhbnNpdGlvbjp0cmFuc2Zvcm0gMC4yNXMgZWFzZX0udGItaW1hZ2UgLnRiLWltYWdlLWNhcHRpb24tZml0LXRvLWltYWdle2Rpc3BsYXk6dGFibGV9LnRiLWltYWdlIC50Yi1pbWFnZS1jYXB0aW9uLWZpdC10by1pbWFnZSAudGItaW1hZ2UtY2FwdGlvbntkaXNwbGF5OnRhYmxlLWNhcHRpb247Y2FwdGlvbi1zaWRlOmJvdHRvbX0gI3RiY3NzIC50Yi1pbWFnZVtkYXRhLXRvb2xzZXQtYmxvY2tzLWltYWdlPSJkZjc2YjgwMDM1YmRlMTg1YjRkMTA4MDBkNWU4NzNmZiJdIHsgbWF4LXdpZHRoOiAxMDAlO3RyYW5zZm9ybTogcm90YXRlKDBkZWcpOyB9ICN0YmNzcyAudGItaW1hZ2VbZGF0YS10b29sc2V0LWJsb2Nrcy1pbWFnZT0iZGY3NmI4MDAzNWJkZTE4NWI0ZDEwODAwZDVlODczZmYiXSAudGItaW1hZ2Utc2hhZG93LTEtaW5uZXIgeyBib3JkZXI6IDBweCBzb2xpZCByZ2JhKCAyNTUsIDI1NSwgMjU1LCAxICk7Ym9yZGVyLXJhZGl1czogMDsgfSAjdGJjc3MgLnRiLWltYWdlW2RhdGEtdG9vbHNldC1ibG9ja3MtaW1hZ2U9ImRmNzZiODAwMzViZGUxODViNGQxMDgwMGQ1ZTg3M2ZmIl06aG92ZXIgeyB0cmFuc2Zvcm06IHJvdGF0ZSgwZGVnKSBzY2FsZSgxLjAyKTsgfSAudGItY29udGFpbmVyIC50Yi1jb250YWluZXItaW5uZXJ7d2lkdGg6MTAwJTttYXJnaW46MCBhdXRvfSAjdGJjc3MgLndwLWJsb2NrLXRvb2xzZXQtYmxvY2tzLWNvbnRhaW5lci50Yi1jb250YWluZXJbZGF0YS10b29sc2V0LWJsb2Nrcy1jb250YWluZXI9ImIzM2IwM2FkM2I0NTljYzViMWY4YzljMjFhY2E1MGJmIl0geyBib3JkZXItcmFkaXVzOiAxMnB4O2JhY2tncm91bmQ6IHJnYmEoIDI1NSwgMjU1LCAyNTUsIDEgKTtwYWRkaW5nOiA0MHB4IDQ4cHggNnB4IDQ4cHg7bWFyZ2luLXRvcDogNjBweDttYXJnaW4tYm90dG9tOiA2MHB4O2JveC1zaGFkb3c6IDVweCA1cHggMTBweCAwIHJnYmEoIDAsIDAsIDAsIDAuNSApO2JvcmRlcjogMHB4IHNvbGlkIHJnYmEoIDE5NiwgNDQsIDksIDEgKTsgfSAjdGJjc3MgLnRiLWhlYWRpbmdbZGF0YS10b29sc2V0LWJsb2Nrcy1oZWFkaW5nPSJmOTcwZDBiZWViMzFhM2ZhNmQ1ODUyNDBiM2I4YjVjOSJdICB7IGZvbnQtc2l6ZTogMzZweDtmb250LXdlaWdodDogYm9sZDtjb2xvcjogcmdiYSggMjA0LCA1OCwgMCwgMSApO3RleHQtYWxpZ246IGxlZnQ7cGFkZGluZy1ib3R0b206IDBweDttYXJnaW4tYm90dG9tOiAyNHB4O2JvcmRlci1ib3R0b206IDNweCBzb2xpZCByZ2JhKCAxOTYsIDQ0LCA5LCAxICk7IH0gIEBtZWRpYSBvbmx5IHNjcmVlbiBhbmQgKG1heC13aWR0aDogNzgxcHgpIHsgLnRiLWNvbnRhaW5lciAudGItY29udGFpbmVyLWlubmVye3dpZHRoOjEwMCU7bWFyZ2luOjAgYXV0b30udGItY29udGFpbmVyIC50Yi1jb250YWluZXItaW5uZXJ7d2lkdGg6MTAwJTttYXJnaW46MCBhdXRvfS50Yi1ncmlkLC50Yi1ncmlkPi5ibG9jay1lZGl0b3ItaW5uZXItYmxvY2tzPi5ibG9jay1lZGl0b3ItYmxvY2stbGlzdF9fbGF5b3V0e2Rpc3BsYXk6Z3JpZDtncmlkLXJvdy1nYXA6MjVweDtncmlkLWNvbHVtbi1nYXA6MjVweH0udGItZ3JpZC1pdGVte2JhY2tncm91bmQ6I2QzOGEwMztwYWRkaW5nOjMwcHh9LnRiLWdyaWQtY29sdW1ue2ZsZXgtd3JhcDp3cmFwfS50Yi1ncmlkLWNvbHVtbj4qe3dpZHRoOjEwMCV9LnRiLWdyaWQtY29sdW1uLnRiLWdyaWQtYWxpZ24tdG9we3dpZHRoOjEwMCU7ZGlzcGxheTpmbGV4O2FsaWduLWNvbnRlbnQ6ZmxleC1zdGFydH0udGItZ3JpZC1jb2x1bW4udGItZ3JpZC1hbGlnbi1jZW50ZXJ7d2lkdGg6MTAwJTtkaXNwbGF5OmZsZXg7YWxpZ24tY29udGVudDpjZW50ZXJ9LnRiLWdyaWQtY29sdW1uLnRiLWdyaWQtYWxpZ24tYm90dG9te3dpZHRoOjEwMCU7ZGlzcGxheTpmbGV4O2FsaWduLWNvbnRlbnQ6ZmxleC1lbmR9ICN0YmNzcyAud3AtYmxvY2stdG9vbHNldC1ibG9ja3MtZ3JpZC50Yi1ncmlkW2RhdGEtdG9vbHNldC1ibG9ja3MtZ3JpZD0iMmJmOTg5N2E0NzgzMGUwNmJlZGFjNzI3NDAzY2UzZTMiXSB7IGdyaWQtdGVtcGxhdGUtY29sdW1uczogbWlubWF4KDAsIDAuMmZyKSBtaW5tYXgoMCwgMC4yZnIpIG1pbm1heCgwLCAwLjJmcikgbWlubWF4KDAsIDAuMmZyKSBtaW5tYXgoMCwgMC4yZnIpO2dyaWQtYXV0by1mbG93OiByb3cgfSAjdGJjc3MgLndwLWJsb2NrLXRvb2xzZXQtYmxvY2tzLWdyaWQudGItZ3JpZFtkYXRhLXRvb2xzZXQtYmxvY2tzLWdyaWQ9IjJiZjk4OTdhNDc4MzBlMDZiZWRhYzcyNzQwM2NlM2UzIl0gPiAudGItZ3JpZC1jb2x1bW46bnRoLW9mLXR5cGUoNW4gKyAxKSB7IGdyaWQtY29sdW1uOiAxIH0gI3RiY3NzIC53cC1ibG9jay10b29sc2V0LWJsb2Nrcy1ncmlkLnRiLWdyaWRbZGF0YS10b29sc2V0LWJsb2Nrcy1ncmlkPSIyYmY5ODk3YTQ3ODMwZTA2YmVkYWM3Mjc0MDNjZTNlMyJdID4gLnRiLWdyaWQtY29sdW1uOm50aC1vZi10eXBlKDVuICsgMikgeyBncmlkLWNvbHVtbjogMiB9ICN0YmNzcyAud3AtYmxvY2stdG9vbHNldC1ibG9ja3MtZ3JpZC50Yi1ncmlkW2RhdGEtdG9vbHNldC1ibG9ja3MtZ3JpZD0iMmJmOTg5N2E0NzgzMGUwNmJlZGFjNzI3NDAzY2UzZTMiXSA+IC50Yi1ncmlkLWNvbHVtbjpudGgtb2YtdHlwZSg1biArIDMpIHsgZ3JpZC1jb2x1bW46IDMgfSAjdGJjc3MgLndwLWJsb2NrLXRvb2xzZXQtYmxvY2tzLWdyaWQudGItZ3JpZFtkYXRhLXRvb2xzZXQtYmxvY2tzLWdyaWQ9IjJiZjk4OTdhNDc4MzBlMDZiZWRhYzcyNzQwM2NlM2UzIl0gPiAudGItZ3JpZC1jb2x1bW46bnRoLW9mLXR5cGUoNW4gKyA0KSB7IGdyaWQtY29sdW1uOiA0IH0gI3RiY3NzIC53cC1ibG9jay10b29sc2V0LWJsb2Nrcy1ncmlkLnRiLWdyaWRbZGF0YS10b29sc2V0LWJsb2Nrcy1ncmlkPSIyYmY5ODk3YTQ3ODMwZTA2YmVkYWM3Mjc0MDNjZTNlMyJdID4gLnRiLWdyaWQtY29sdW1uOm50aC1vZi10eXBlKDVuICsgNSkgeyBncmlkLWNvbHVtbjogNSB9IC50Yi1idXR0b257Y29sb3I6I2YxZjFmMX0udGItYnV0dG9uLS1sZWZ0e3RleHQtYWxpZ246bGVmdH0udGItYnV0dG9uLS1jZW50ZXJ7dGV4dC1hbGlnbjpjZW50ZXJ9LnRiLWJ1dHRvbi0tcmlnaHR7dGV4dC1hbGlnbjpyaWdodH0udGItYnV0dG9uX19saW5re2NvbG9yOmluaGVyaXQ7Y3Vyc29yOnBvaW50ZXI7ZGlzcGxheTppbmxpbmUtYmxvY2s7bGluZS1oZWlnaHQ6MTAwJTt0ZXh0LWRlY29yYXRpb246bm9uZSAhaW1wb3J0YW50O3RleHQtYWxpZ246Y2VudGVyO3RyYW5zaXRpb246YWxsIDAuM3MgZWFzZX0udGItYnV0dG9uX19saW5rOmhvdmVyLC50Yi1idXR0b25fX2xpbms6Zm9jdXMsLnRiLWJ1dHRvbl9fbGluazp2aXNpdGVke2NvbG9yOmluaGVyaXR9LnRiLWJ1dHRvbl9fbGluazpob3ZlciAudGItYnV0dG9uX19jb250ZW50LC50Yi1idXR0b25fX2xpbms6Zm9jdXMgLnRiLWJ1dHRvbl9fY29udGVudCwudGItYnV0dG9uX19saW5rOnZpc2l0ZWQgLnRiLWJ1dHRvbl9fY29udGVudHtmb250LWZhbWlseTppbmhlcml0O2ZvbnQtc3R5bGU6aW5oZXJpdDtmb250LXdlaWdodDppbmhlcml0O2xldHRlci1zcGFjaW5nOmluaGVyaXQ7dGV4dC1kZWNvcmF0aW9uOmluaGVyaXQ7dGV4dC1zaGFkb3c6aW5oZXJpdDt0ZXh0LXRyYW5zZm9ybTppbmhlcml0fS50Yi1idXR0b25fX2NvbnRlbnR7dmVydGljYWwtYWxpZ246bWlkZGxlO3RyYW5zaXRpb246YWxsIDAuM3MgZWFzZX0udGItYnV0dG9uX19pY29ue3RyYW5zaXRpb246YWxsIDAuM3MgZWFzZTtkaXNwbGF5OmlubGluZS1ibG9jazt2ZXJ0aWNhbC1hbGlnbjptaWRkbGU7Zm9udC1zdHlsZTpub3JtYWwgIWltcG9ydGFudH0udGItYnV0dG9uX19pY29uOjpiZWZvcmV7Y29udGVudDphdHRyKGRhdGEtZm9udC1jb2RlKTtmb250LXdlaWdodDpub3JtYWwgIWltcG9ydGFudH0udGItYnV0dG9uX19saW5re2JhY2tncm91bmQtY29sb3I6IzQ0NDtib3JkZXItcmFkaXVzOjAuM2VtO2ZvbnQtc2l6ZToxLjNlbTttYXJnaW4tYm90dG9tOjAuNzZlbTtwYWRkaW5nOjAuNTVlbSAxLjVlbSAwLjU1ZW19IC50Yi1pbWFnZXtwb3NpdGlvbjpyZWxhdGl2ZTt0cmFuc2l0aW9uOnRyYW5zZm9ybSAwLjI1cyBlYXNlfS53cC1ibG9jay1pbWFnZSAudGItaW1hZ2UuYWxpZ25jZW50ZXJ7bWFyZ2luLWxlZnQ6YXV0bzttYXJnaW4tcmlnaHQ6YXV0b30udGItaW1hZ2UgaW1ne21heC13aWR0aDoxMDAlO2hlaWdodDphdXRvO3dpZHRoOmF1dG87dHJhbnNpdGlvbjp0cmFuc2Zvcm0gMC4yNXMgZWFzZX0udGItaW1hZ2UgLnRiLWltYWdlLWNhcHRpb24tZml0LXRvLWltYWdle2Rpc3BsYXk6dGFibGV9LnRiLWltYWdlIC50Yi1pbWFnZS1jYXB0aW9uLWZpdC10by1pbWFnZSAudGItaW1hZ2UtY2FwdGlvbntkaXNwbGF5OnRhYmxlLWNhcHRpb247Y2FwdGlvbi1zaWRlOmJvdHRvbX0udGItYnV0dG9ue2NvbG9yOiNmMWYxZjF9LnRiLWJ1dHRvbi0tbGVmdHt0ZXh0LWFsaWduOmxlZnR9LnRiLWJ1dHRvbi0tY2VudGVye3RleHQtYWxpZ246Y2VudGVyfS50Yi1idXR0b24tLXJpZ2h0e3RleHQtYWxpZ246cmlnaHR9LnRiLWJ1dHRvbl9fbGlua3tjb2xvcjppbmhlcml0O2N1cnNvcjpwb2ludGVyO2Rpc3BsYXk6aW5saW5lLWJsb2NrO2xpbmUtaGVpZ2h0OjEwMCU7dGV4dC1kZWNvcmF0aW9uOm5vbmUgIWltcG9ydGFudDt0ZXh0LWFsaWduOmNlbnRlcjt0cmFuc2l0aW9uOmFsbCAwLjNzIGVhc2V9LnRiLWJ1dHRvbl9fbGluazpob3ZlciwudGItYnV0dG9uX19saW5rOmZvY3VzLC50Yi1idXR0b25fX2xpbms6dmlzaXRlZHtjb2xvcjppbmhlcml0fS50Yi1idXR0b25fX2xpbms6aG92ZXIgLnRiLWJ1dHRvbl9fY29udGVudCwudGItYnV0dG9uX19saW5rOmZvY3VzIC50Yi1idXR0b25fX2NvbnRlbnQsLnRiLWJ1dHRvbl9fbGluazp2aXNpdGVkIC50Yi1idXR0b25fX2NvbnRlbnR7Zm9udC1mYW1pbHk6aW5oZXJpdDtmb250LXN0eWxlOmluaGVyaXQ7Zm9udC13ZWlnaHQ6aW5oZXJpdDtsZXR0ZXItc3BhY2luZzppbmhlcml0O3RleHQtZGVjb3JhdGlvbjppbmhlcml0O3RleHQtc2hhZG93OmluaGVyaXQ7dGV4dC10cmFuc2Zvcm06aW5oZXJpdH0udGItYnV0dG9uX19jb250ZW50e3ZlcnRpY2FsLWFsaWduOm1pZGRsZTt0cmFuc2l0aW9uOmFsbCAwLjNzIGVhc2V9LnRiLWJ1dHRvbl9faWNvbnt0cmFuc2l0aW9uOmFsbCAwLjNzIGVhc2U7ZGlzcGxheTppbmxpbmUtYmxvY2s7dmVydGljYWwtYWxpZ246bWlkZGxlO2ZvbnQtc3R5bGU6bm9ybWFsICFpbXBvcnRhbnR9LnRiLWJ1dHRvbl9faWNvbjo6YmVmb3Jle2NvbnRlbnQ6YXR0cihkYXRhLWZvbnQtY29kZSk7Zm9udC13ZWlnaHQ6bm9ybWFsICFpbXBvcnRhbnR9LnRiLWJ1dHRvbl9fbGlua3tiYWNrZ3JvdW5kLWNvbG9yOiM0NDQ7Ym9yZGVyLXJhZGl1czowLjNlbTtmb250LXNpemU6MS4zZW07bWFyZ2luLWJvdHRvbTowLjc2ZW07cGFkZGluZzowLjU1ZW0gMS41ZW0gMC41NWVtfS50Yi1pbWFnZXtwb3NpdGlvbjpyZWxhdGl2ZTt0cmFuc2l0aW9uOnRyYW5zZm9ybSAwLjI1cyBlYXNlfS53cC1ibG9jay1pbWFnZSAudGItaW1hZ2UuYWxpZ25jZW50ZXJ7bWFyZ2luLWxlZnQ6YXV0bzttYXJnaW4tcmlnaHQ6YXV0b30udGItaW1hZ2UgaW1ne21heC13aWR0aDoxMDAlO2hlaWdodDphdXRvO3dpZHRoOmF1dG87dHJhbnNpdGlvbjp0cmFuc2Zvcm0gMC4yNXMgZWFzZX0udGItaW1hZ2UgLnRiLWltYWdlLWNhcHRpb24tZml0LXRvLWltYWdle2Rpc3BsYXk6dGFibGV9LnRiLWltYWdlIC50Yi1pbWFnZS1jYXB0aW9uLWZpdC10by1pbWFnZSAudGItaW1hZ2UtY2FwdGlvbntkaXNwbGF5OnRhYmxlLWNhcHRpb247Y2FwdGlvbi1zaWRlOmJvdHRvbX0jdGJjc3MgLndwLWJsb2NrLXRvb2xzZXQtYmxvY2tzLWdyaWQtY29sdW1uLnRiLWdyaWQtY29sdW1uW2RhdGEtdG9vbHNldC1ibG9ja3MtZ3JpZC1jb2x1bW49IjYxNDNlYmI4YTNkZGU2YzY3YzhiN2EwNDcxNjZmNjNmIl0geyBkaXNwbGF5OiBmbGV4OyB9IC50Yi1idXR0b257Y29sb3I6I2YxZjFmMX0udGItYnV0dG9uLS1sZWZ0e3RleHQtYWxpZ246bGVmdH0udGItYnV0dG9uLS1jZW50ZXJ7dGV4dC1hbGlnbjpjZW50ZXJ9LnRiLWJ1dHRvbi0tcmlnaHR7dGV4dC1hbGlnbjpyaWdodH0udGItYnV0dG9uX19saW5re2NvbG9yOmluaGVyaXQ7Y3Vyc29yOnBvaW50ZXI7ZGlzcGxheTppbmxpbmUtYmxvY2s7bGluZS1oZWlnaHQ6MTAwJTt0ZXh0LWRlY29yYXRpb246bm9uZSAhaW1wb3J0YW50O3RleHQtYWxpZ246Y2VudGVyO3RyYW5zaXRpb246YWxsIDAuM3MgZWFzZX0udGItYnV0dG9uX19saW5rOmhvdmVyLC50Yi1idXR0b25fX2xpbms6Zm9jdXMsLnRiLWJ1dHRvbl9fbGluazp2aXNpdGVke2NvbG9yOmluaGVyaXR9LnRiLWJ1dHRvbl9fbGluazpob3ZlciAudGItYnV0dG9uX19jb250ZW50LC50Yi1idXR0b25fX2xpbms6Zm9jdXMgLnRiLWJ1dHRvbl9fY29udGVudCwudGItYnV0dG9uX19saW5rOnZpc2l0ZWQgLnRiLWJ1dHRvbl9fY29udGVudHtmb250LWZhbWlseTppbmhlcml0O2ZvbnQtc3R5bGU6aW5oZXJpdDtmb250LXdlaWdodDppbmhlcml0O2xldHRlci1zcGFjaW5nOmluaGVyaXQ7dGV4dC1kZWNvcmF0aW9uOmluaGVyaXQ7dGV4dC1zaGFkb3c6aW5oZXJpdDt0ZXh0LXRyYW5zZm9ybTppbmhlcml0fS50Yi1idXR0b25fX2NvbnRlbnR7dmVydGljYWwtYWxpZ246bWlkZGxlO3RyYW5zaXRpb246YWxsIDAuM3MgZWFzZX0udGItYnV0dG9uX19pY29ue3RyYW5zaXRpb246YWxsIDAuM3MgZWFzZTtkaXNwbGF5OmlubGluZS1ibG9jazt2ZXJ0aWNhbC1hbGlnbjptaWRkbGU7Zm9udC1zdHlsZTpub3JtYWwgIWltcG9ydGFudH0udGItYnV0dG9uX19pY29uOjpiZWZvcmV7Y29udGVudDphdHRyKGRhdGEtZm9udC1jb2RlKTtmb250LXdlaWdodDpub3JtYWwgIWltcG9ydGFudH0udGItYnV0dG9uX19saW5re2JhY2tncm91bmQtY29sb3I6IzQ0NDtib3JkZXItcmFkaXVzOjAuM2VtO2ZvbnQtc2l6ZToxLjNlbTttYXJnaW4tYm90dG9tOjAuNzZlbTtwYWRkaW5nOjAuNTVlbSAxLjVlbSAwLjU1ZW19IC50Yi1pbWFnZXtwb3NpdGlvbjpyZWxhdGl2ZTt0cmFuc2l0aW9uOnRyYW5zZm9ybSAwLjI1cyBlYXNlfS53cC1ibG9jay1pbWFnZSAudGItaW1hZ2UuYWxpZ25jZW50ZXJ7bWFyZ2luLWxlZnQ6YXV0bzttYXJnaW4tcmlnaHQ6YXV0b30udGItaW1hZ2UgaW1ne21heC13aWR0aDoxMDAlO2hlaWdodDphdXRvO3dpZHRoOmF1dG87dHJhbnNpdGlvbjp0cmFuc2Zvcm0gMC4yNXMgZWFzZX0udGItaW1hZ2UgLnRiLWltYWdlLWNhcHRpb24tZml0LXRvLWltYWdle2Rpc3BsYXk6dGFibGV9LnRiLWltYWdlIC50Yi1pbWFnZS1jYXB0aW9uLWZpdC10by1pbWFnZSAudGItaW1hZ2UtY2FwdGlvbntkaXNwbGF5OnRhYmxlLWNhcHRpb247Y2FwdGlvbi1zaWRlOmJvdHRvbX0gI3RiY3NzIGgyLnRiLWhlYWRpbmdbZGF0YS10b29sc2V0LWJsb2Nrcy1oZWFkaW5nPSI0YzYwMjFjMjE4ZThkZTQxZGI3OTk5ZGMyNTY3MzUwOSJdICB7IGZvbnQtc2l6ZTogNDJweDsgfSAgLnRiLWdyaWQsLnRiLWdyaWQ+LmJsb2NrLWVkaXRvci1pbm5lci1ibG9ja3M+LmJsb2NrLWVkaXRvci1ibG9jay1saXN0X19sYXlvdXR7ZGlzcGxheTpncmlkO2dyaWQtcm93LWdhcDoyNXB4O2dyaWQtY29sdW1uLWdhcDoyNXB4fS50Yi1ncmlkLWl0ZW17YmFja2dyb3VuZDojZDM4YTAzO3BhZGRpbmc6MzBweH0udGItZ3JpZC1jb2x1bW57ZmxleC13cmFwOndyYXB9LnRiLWdyaWQtY29sdW1uPip7d2lkdGg6MTAwJX0udGItZ3JpZC1jb2x1bW4udGItZ3JpZC1hbGlnbi10b3B7d2lkdGg6MTAwJTtkaXNwbGF5OmZsZXg7YWxpZ24tY29udGVudDpmbGV4LXN0YXJ0fS50Yi1ncmlkLWNvbHVtbi50Yi1ncmlkLWFsaWduLWNlbnRlcnt3aWR0aDoxMDAlO2Rpc3BsYXk6ZmxleDthbGlnbi1jb250ZW50OmNlbnRlcn0udGItZ3JpZC1jb2x1bW4udGItZ3JpZC1hbGlnbi1ib3R0b217d2lkdGg6MTAwJTtkaXNwbGF5OmZsZXg7YWxpZ24tY29udGVudDpmbGV4LWVuZH0gI3RiY3NzIC53cC1ibG9jay10b29sc2V0LWJsb2Nrcy1ncmlkLnRiLWdyaWRbZGF0YS10b29sc2V0LWJsb2Nrcy1ncmlkPSJmYjY4ZTlhODczODY3YjM2ZDVjMTNjMDEwMDU2NDhlMiJdIHsgZ3JpZC10ZW1wbGF0ZS1jb2x1bW5zOiBtaW5tYXgoMCwgMC4zMzMzZnIpIG1pbm1heCgwLCAwLjMzMzNmcikgbWlubWF4KDAsIDAuMzMzM2ZyKTtncmlkLWF1dG8tZmxvdzogcm93IH0gI3RiY3NzIC53cC1ibG9jay10b29sc2V0LWJsb2Nrcy1ncmlkLnRiLWdyaWRbZGF0YS10b29sc2V0LWJsb2Nrcy1ncmlkPSJmYjY4ZTlhODczODY3YjM2ZDVjMTNjMDEwMDU2NDhlMiJdID4gLnRiLWdyaWQtY29sdW1uOm50aC1vZi10eXBlKDNuICsgMSkgeyBncmlkLWNvbHVtbjogMSB9ICN0YmNzcyAud3AtYmxvY2stdG9vbHNldC1ibG9ja3MtZ3JpZC50Yi1ncmlkW2RhdGEtdG9vbHNldC1ibG9ja3MtZ3JpZD0iZmI2OGU5YTg3Mzg2N2IzNmQ1YzEzYzAxMDA1NjQ4ZTIiXSA+IC50Yi1ncmlkLWNvbHVtbjpudGgtb2YtdHlwZSgzbiArIDIpIHsgZ3JpZC1jb2x1bW46IDIgfSAjdGJjc3MgLndwLWJsb2NrLXRvb2xzZXQtYmxvY2tzLWdyaWQudGItZ3JpZFtkYXRhLXRvb2xzZXQtYmxvY2tzLWdyaWQ9ImZiNjhlOWE4NzM4NjdiMzZkNWMxM2MwMTAwNTY0OGUyIl0gPiAudGItZ3JpZC1jb2x1bW46bnRoLW9mLXR5cGUoM24gKyAzKSB7IGdyaWQtY29sdW1uOiAzIH0gI3RiY3NzIC53cC1ibG9jay10b29sc2V0LWJsb2Nrcy1ncmlkLWNvbHVtbi50Yi1ncmlkLWNvbHVtbltkYXRhLXRvb2xzZXQtYmxvY2tzLWdyaWQtY29sdW1uPSIzMDM0ZmJlODg2YzExMDU0ZTk1YjQ2YjA5ZDNlNDExMiJdIHsgZGlzcGxheTogZmxleDsgfSAudGItaW1hZ2V7cG9zaXRpb246cmVsYXRpdmU7dHJhbnNpdGlvbjp0cmFuc2Zvcm0gMC4yNXMgZWFzZX0ud3AtYmxvY2staW1hZ2UgLnRiLWltYWdlLmFsaWduY2VudGVye21hcmdpbi1sZWZ0OmF1dG87bWFyZ2luLXJpZ2h0OmF1dG99LnRiLWltYWdlIGltZ3ttYXgtd2lkdGg6MTAwJTtoZWlnaHQ6YXV0bzt3aWR0aDphdXRvO3RyYW5zaXRpb246dHJhbnNmb3JtIDAuMjVzIGVhc2V9LnRiLWltYWdlIC50Yi1pbWFnZS1jYXB0aW9uLWZpdC10by1pbWFnZXtkaXNwbGF5OnRhYmxlfS50Yi1pbWFnZSAudGItaW1hZ2UtY2FwdGlvbi1maXQtdG8taW1hZ2UgLnRiLWltYWdlLWNhcHRpb257ZGlzcGxheTp0YWJsZS1jYXB0aW9uO2NhcHRpb24tc2lkZTpib3R0b219LnRiLWltYWdle3Bvc2l0aW9uOnJlbGF0aXZlO3RyYW5zaXRpb246dHJhbnNmb3JtIDAuMjVzIGVhc2V9LndwLWJsb2NrLWltYWdlIC50Yi1pbWFnZS5hbGlnbmNlbnRlcnttYXJnaW4tbGVmdDphdXRvO21hcmdpbi1yaWdodDphdXRvfS50Yi1pbWFnZSBpbWd7bWF4LXdpZHRoOjEwMCU7aGVpZ2h0OmF1dG87d2lkdGg6YXV0bzt0cmFuc2l0aW9uOnRyYW5zZm9ybSAwLjI1cyBlYXNlfS50Yi1pbWFnZSAudGItaW1hZ2UtY2FwdGlvbi1maXQtdG8taW1hZ2V7ZGlzcGxheTp0YWJsZX0udGItaW1hZ2UgLnRiLWltYWdlLWNhcHRpb24tZml0LXRvLWltYWdlIC50Yi1pbWFnZS1jYXB0aW9ue2Rpc3BsYXk6dGFibGUtY2FwdGlvbjtjYXB0aW9uLXNpZGU6Ym90dG9tfS50Yi1pbWFnZXtwb3NpdGlvbjpyZWxhdGl2ZTt0cmFuc2l0aW9uOnRyYW5zZm9ybSAwLjI1cyBlYXNlfS53cC1ibG9jay1pbWFnZSAudGItaW1hZ2UuYWxpZ25jZW50ZXJ7bWFyZ2luLWxlZnQ6YXV0bzttYXJnaW4tcmlnaHQ6YXV0b30udGItaW1hZ2UgaW1ne21heC13aWR0aDoxMDAlO2hlaWdodDphdXRvO3dpZHRoOmF1dG87dHJhbnNpdGlvbjp0cmFuc2Zvcm0gMC4yNXMgZWFzZX0udGItaW1hZ2UgLnRiLWltYWdlLWNhcHRpb24tZml0LXRvLWltYWdle2Rpc3BsYXk6dGFibGV9LnRiLWltYWdlIC50Yi1pbWFnZS1jYXB0aW9uLWZpdC10by1pbWFnZSAudGItaW1hZ2UtY2FwdGlvbntkaXNwbGF5OnRhYmxlLWNhcHRpb247Y2FwdGlvbi1zaWRlOmJvdHRvbX0udGItZ3JpZCwudGItZ3JpZD4uYmxvY2stZWRpdG9yLWlubmVyLWJsb2Nrcz4uYmxvY2stZWRpdG9yLWJsb2NrLWxpc3RfX2xheW91dHtkaXNwbGF5OmdyaWQ7Z3JpZC1yb3ctZ2FwOjI1cHg7Z3JpZC1jb2x1bW4tZ2FwOjI1cHh9LnRiLWdyaWQtaXRlbXtiYWNrZ3JvdW5kOiNkMzhhMDM7cGFkZGluZzozMHB4fS50Yi1ncmlkLWNvbHVtbntmbGV4LXdyYXA6d3JhcH0udGItZ3JpZC1jb2x1bW4+Knt3aWR0aDoxMDAlfS50Yi1ncmlkLWNvbHVtbi50Yi1ncmlkLWFsaWduLXRvcHt3aWR0aDoxMDAlO2Rpc3BsYXk6ZmxleDthbGlnbi1jb250ZW50OmZsZXgtc3RhcnR9LnRiLWdyaWQtY29sdW1uLnRiLWdyaWQtYWxpZ24tY2VudGVye3dpZHRoOjEwMCU7ZGlzcGxheTpmbGV4O2FsaWduLWNvbnRlbnQ6Y2VudGVyfS50Yi1ncmlkLWNvbHVtbi50Yi1ncmlkLWFsaWduLWJvdHRvbXt3aWR0aDoxMDAlO2Rpc3BsYXk6ZmxleDthbGlnbi1jb250ZW50OmZsZXgtZW5kfSAjdGJjc3MgLndwLWJsb2NrLXRvb2xzZXQtYmxvY2tzLWdyaWQudGItZ3JpZFtkYXRhLXRvb2xzZXQtYmxvY2tzLWdyaWQ9ImYyMjJmMzU5MjZjMjA2ZWY4MTIyMGRhYzY3OTQ1MzY1Il0geyBncmlkLXRlbXBsYXRlLWNvbHVtbnM6IG1pbm1heCgwLCAwLjVmcikgbWlubWF4KDAsIDAuNWZyKTtncmlkLWF1dG8tZmxvdzogcm93IH0gI3RiY3NzIC53cC1ibG9jay10b29sc2V0LWJsb2Nrcy1ncmlkLnRiLWdyaWRbZGF0YS10b29sc2V0LWJsb2Nrcy1ncmlkPSJmMjIyZjM1OTI2YzIwNmVmODEyMjBkYWM2Nzk0NTM2NSJdID4gLnRiLWdyaWQtY29sdW1uOm50aC1vZi10eXBlKDJuICsgMSkgeyBncmlkLWNvbHVtbjogMSB9ICN0YmNzcyAud3AtYmxvY2stdG9vbHNldC1ibG9ja3MtZ3JpZC50Yi1ncmlkW2RhdGEtdG9vbHNldC1ibG9ja3MtZ3JpZD0iZjIyMmYzNTkyNmMyMDZlZjgxMjIwZGFjNjc5NDUzNjUiXSA+IC50Yi1ncmlkLWNvbHVtbjpudGgtb2YtdHlwZSgybiArIDIpIHsgZ3JpZC1jb2x1bW46IDIgfSAgIC50Yi1pbWFnZXtwb3NpdGlvbjpyZWxhdGl2ZTt0cmFuc2l0aW9uOnRyYW5zZm9ybSAwLjI1cyBlYXNlfS53cC1ibG9jay1pbWFnZSAudGItaW1hZ2UuYWxpZ25jZW50ZXJ7bWFyZ2luLWxlZnQ6YXV0bzttYXJnaW4tcmlnaHQ6YXV0b30udGItaW1hZ2UgaW1ne21heC13aWR0aDoxMDAlO2hlaWdodDphdXRvO3dpZHRoOmF1dG87dHJhbnNpdGlvbjp0cmFuc2Zvcm0gMC4yNXMgZWFzZX0udGItaW1hZ2UgLnRiLWltYWdlLWNhcHRpb24tZml0LXRvLWltYWdle2Rpc3BsYXk6dGFibGV9LnRiLWltYWdlIC50Yi1pbWFnZS1jYXB0aW9uLWZpdC10by1pbWFnZSAudGItaW1hZ2UtY2FwdGlvbntkaXNwbGF5OnRhYmxlLWNhcHRpb247Y2FwdGlvbi1zaWRlOmJvdHRvbX0udGItaW1hZ2V7cG9zaXRpb246cmVsYXRpdmU7dHJhbnNpdGlvbjp0cmFuc2Zvcm0gMC4yNXMgZWFzZX0ud3AtYmxvY2staW1hZ2UgLnRiLWltYWdlLmFsaWduY2VudGVye21hcmdpbi1sZWZ0OmF1dG87bWFyZ2luLXJpZ2h0OmF1dG99LnRiLWltYWdlIGltZ3ttYXgtd2lkdGg6MTAwJTtoZWlnaHQ6YXV0bzt3aWR0aDphdXRvO3RyYW5zaXRpb246dHJhbnNmb3JtIDAuMjVzIGVhc2V9LnRiLWltYWdlIC50Yi1pbWFnZS1jYXB0aW9uLWZpdC10by1pbWFnZXtkaXNwbGF5OnRhYmxlfS50Yi1pbWFnZSAudGItaW1hZ2UtY2FwdGlvbi1maXQtdG8taW1hZ2UgLnRiLWltYWdlLWNhcHRpb257ZGlzcGxheTp0YWJsZS1jYXB0aW9uO2NhcHRpb24tc2lkZTpib3R0b219IC50Yi1ncmlkLC50Yi1ncmlkPi5ibG9jay1lZGl0b3ItaW5uZXItYmxvY2tzPi5ibG9jay1lZGl0b3ItYmxvY2stbGlzdF9fbGF5b3V0e2Rpc3BsYXk6Z3JpZDtncmlkLXJvdy1nYXA6MjVweDtncmlkLWNvbHVtbi1nYXA6MjVweH0udGItZ3JpZC1pdGVte2JhY2tncm91bmQ6I2QzOGEwMztwYWRkaW5nOjMwcHh9LnRiLWdyaWQtY29sdW1ue2ZsZXgtd3JhcDp3cmFwfS50Yi1ncmlkLWNvbHVtbj4qe3dpZHRoOjEwMCV9LnRiLWdyaWQtY29sdW1uLnRiLWdyaWQtYWxpZ24tdG9we3dpZHRoOjEwMCU7ZGlzcGxheTpmbGV4O2FsaWduLWNvbnRlbnQ6ZmxleC1zdGFydH0udGItZ3JpZC1jb2x1bW4udGItZ3JpZC1hbGlnbi1jZW50ZXJ7d2lkdGg6MTAwJTtkaXNwbGF5OmZsZXg7YWxpZ24tY29udGVudDpjZW50ZXJ9LnRiLWdyaWQtY29sdW1uLnRiLWdyaWQtYWxpZ24tYm90dG9te3dpZHRoOjEwMCU7ZGlzcGxheTpmbGV4O2FsaWduLWNvbnRlbnQ6ZmxleC1lbmR9ICN0YmNzcyAud3AtYmxvY2stdG9vbHNldC1ibG9ja3MtZ3JpZC50Yi1ncmlkW2RhdGEtdG9vbHNldC1ibG9ja3MtZ3JpZD0iZGRhZjZmNTkyZjE2ZDZmYTBiYWE5YmU3MTcxNTlhODciXSB7IGdyaWQtdGVtcGxhdGUtY29sdW1uczogbWlubWF4KDAsIDAuNWZyKSBtaW5tYXgoMCwgMC41ZnIpO2dyaWQtYXV0by1mbG93OiByb3cgfSAjdGJjc3MgLndwLWJsb2NrLXRvb2xzZXQtYmxvY2tzLWdyaWQudGItZ3JpZFtkYXRhLXRvb2xzZXQtYmxvY2tzLWdyaWQ9ImRkYWY2ZjU5MmYxNmQ2ZmEwYmFhOWJlNzE3MTU5YTg3Il0gPiAudGItZ3JpZC1jb2x1bW46bnRoLW9mLXR5cGUoMm4gKyAxKSB7IGdyaWQtY29sdW1uOiAxIH0gI3RiY3NzIC53cC1ibG9jay10b29sc2V0LWJsb2Nrcy1ncmlkLnRiLWdyaWRbZGF0YS10b29sc2V0LWJsb2Nrcy1ncmlkPSJkZGFmNmY1OTJmMTZkNmZhMGJhYTliZTcxNzE1OWE4NyJdID4gLnRiLWdyaWQtY29sdW1uOm50aC1vZi10eXBlKDJuICsgMikgeyBncmlkLWNvbHVtbjogMiB9IC50Yi1idXR0b257Y29sb3I6I2YxZjFmMX0udGItYnV0dG9uLS1sZWZ0e3RleHQtYWxpZ246bGVmdH0udGItYnV0dG9uLS1jZW50ZXJ7dGV4dC1hbGlnbjpjZW50ZXJ9LnRiLWJ1dHRvbi0tcmlnaHR7dGV4dC1hbGlnbjpyaWdodH0udGItYnV0dG9uX19saW5re2NvbG9yOmluaGVyaXQ7Y3Vyc29yOnBvaW50ZXI7ZGlzcGxheTppbmxpbmUtYmxvY2s7bGluZS1oZWlnaHQ6MTAwJTt0ZXh0LWRlY29yYXRpb246bm9uZSAhaW1wb3J0YW50O3RleHQtYWxpZ246Y2VudGVyO3RyYW5zaXRpb246YWxsIDAuM3MgZWFzZX0udGItYnV0dG9uX19saW5rOmhvdmVyLC50Yi1idXR0b25fX2xpbms6Zm9jdXMsLnRiLWJ1dHRvbl9fbGluazp2aXNpdGVke2NvbG9yOmluaGVyaXR9LnRiLWJ1dHRvbl9fbGluazpob3ZlciAudGItYnV0dG9uX19jb250ZW50LC50Yi1idXR0b25fX2xpbms6Zm9jdXMgLnRiLWJ1dHRvbl9fY29udGVudCwudGItYnV0dG9uX19saW5rOnZpc2l0ZWQgLnRiLWJ1dHRvbl9fY29udGVudHtmb250LWZhbWlseTppbmhlcml0O2ZvbnQtc3R5bGU6aW5oZXJpdDtmb250LXdlaWdodDppbmhlcml0O2xldHRlci1zcGFjaW5nOmluaGVyaXQ7dGV4dC1kZWNvcmF0aW9uOmluaGVyaXQ7dGV4dC1zaGFkb3c6aW5oZXJpdDt0ZXh0LXRyYW5zZm9ybTppbmhlcml0fS50Yi1idXR0b25fX2NvbnRlbnR7dmVydGljYWwtYWxpZ246bWlkZGxlO3RyYW5zaXRpb246YWxsIDAuM3MgZWFzZX0udGItYnV0dG9uX19pY29ue3RyYW5zaXRpb246YWxsIDAuM3MgZWFzZTtkaXNwbGF5OmlubGluZS1ibG9jazt2ZXJ0aWNhbC1hbGlnbjptaWRkbGU7Zm9udC1zdHlsZTpub3JtYWwgIWltcG9ydGFudH0udGItYnV0dG9uX19pY29uOjpiZWZvcmV7Y29udGVudDphdHRyKGRhdGEtZm9udC1jb2RlKTtmb250LXdlaWdodDpub3JtYWwgIWltcG9ydGFudH0udGItYnV0dG9uX19saW5re2JhY2tncm91bmQtY29sb3I6IzQ0NDtib3JkZXItcmFkaXVzOjAuM2VtO2ZvbnQtc2l6ZToxLjNlbTttYXJnaW4tYm90dG9tOjAuNzZlbTtwYWRkaW5nOjAuNTVlbSAxLjVlbSAwLjU1ZW19ICAjdGJjc3MgLndwLWJsb2NrLXRvb2xzZXQtYmxvY2tzLWdyaWQtY29sdW1uLnRiLWdyaWQtY29sdW1uW2RhdGEtdG9vbHNldC1ibG9ja3MtZ3JpZC1jb2x1bW49ImY1ODZmZjdiZmUxZDczMTdjNjMxNjJlYzdiNzAzOWVkIl0geyBkaXNwbGF5OiBmbGV4OyB9IC50Yi1pbWFnZXtwb3NpdGlvbjpyZWxhdGl2ZTt0cmFuc2l0aW9uOnRyYW5zZm9ybSAwLjI1cyBlYXNlfS53cC1ibG9jay1pbWFnZSAudGItaW1hZ2UuYWxpZ25jZW50ZXJ7bWFyZ2luLWxlZnQ6YXV0bzttYXJnaW4tcmlnaHQ6YXV0b30udGItaW1hZ2UgaW1ne21heC13aWR0aDoxMDAlO2hlaWdodDphdXRvO3dpZHRoOmF1dG87dHJhbnNpdGlvbjp0cmFuc2Zvcm0gMC4yNXMgZWFzZX0udGItaW1hZ2UgLnRiLWltYWdlLWNhcHRpb24tZml0LXRvLWltYWdle2Rpc3BsYXk6dGFibGV9LnRiLWltYWdlIC50Yi1pbWFnZS1jYXB0aW9uLWZpdC10by1pbWFnZSAudGItaW1hZ2UtY2FwdGlvbntkaXNwbGF5OnRhYmxlLWNhcHRpb247Y2FwdGlvbi1zaWRlOmJvdHRvbX0udGItY29udGFpbmVyIC50Yi1jb250YWluZXItaW5uZXJ7d2lkdGg6MTAwJTttYXJnaW46MCBhdXRvfSAgfSBAbWVkaWEgb25seSBzY3JlZW4gYW5kIChtYXgtd2lkdGg6IDU5OXB4KSB7IC50Yi1jb250YWluZXIgLnRiLWNvbnRhaW5lci1pbm5lcnt3aWR0aDoxMDAlO21hcmdpbjowIGF1dG99LnRiLWNvbnRhaW5lciAudGItY29udGFpbmVyLWlubmVye3dpZHRoOjEwMCU7bWFyZ2luOjAgYXV0b30gI3RiY3NzIC53cC1ibG9jay10b29sc2V0LWJsb2Nrcy1jb250YWluZXIudGItY29udGFpbmVyW2RhdGEtdG9vbHNldC1ibG9ja3MtY29udGFpbmVyPSJkOWYyYTllYWE5NWM5YTMwNTY1MmU0NGFjYmM0MWM1MCJdIHsgcGFkZGluZy1yaWdodDogMHB4O3BhZGRpbmctbGVmdDogMHB4O21hcmdpbi1yaWdodDogOHB4O21hcmdpbi1sZWZ0OiA4cHg7IH0gI3RiY3NzIC53cC1ibG9jay10b29sc2V0LWJsb2Nrcy1jb250YWluZXIudGItY29udGFpbmVyW2RhdGEtdG9vbHNldC1ibG9ja3MtY29udGFpbmVyPSJkOWYyYTllYWE5NWM5YTMwNTY1MmU0NGFjYmM0MWM1MCJdID4gLnRiLWNvbnRhaW5lci1pbm5lciB7IG1heC13aWR0aDogMTAwJTsgfSAudGItZ3JpZCwudGItZ3JpZD4uYmxvY2stZWRpdG9yLWlubmVyLWJsb2Nrcz4uYmxvY2stZWRpdG9yLWJsb2NrLWxpc3RfX2xheW91dHtkaXNwbGF5OmdyaWQ7Z3JpZC1yb3ctZ2FwOjI1cHg7Z3JpZC1jb2x1bW4tZ2FwOjI1cHh9LnRiLWdyaWQtaXRlbXtiYWNrZ3JvdW5kOiNkMzhhMDM7cGFkZGluZzozMHB4fS50Yi1ncmlkLWNvbHVtbntmbGV4LXdyYXA6d3JhcH0udGItZ3JpZC1jb2x1bW4+Knt3aWR0aDoxMDAlfS50Yi1ncmlkLWNvbHVtbi50Yi1ncmlkLWFsaWduLXRvcHt3aWR0aDoxMDAlO2Rpc3BsYXk6ZmxleDthbGlnbi1jb250ZW50OmZsZXgtc3RhcnR9LnRiLWdyaWQtY29sdW1uLnRiLWdyaWQtYWxpZ24tY2VudGVye3dpZHRoOjEwMCU7ZGlzcGxheTpmbGV4O2FsaWduLWNvbnRlbnQ6Y2VudGVyfS50Yi1ncmlkLWNvbHVtbi50Yi1ncmlkLWFsaWduLWJvdHRvbXt3aWR0aDoxMDAlO2Rpc3BsYXk6ZmxleDthbGlnbi1jb250ZW50OmZsZXgtZW5kfSAjdGJjc3MgLndwLWJsb2NrLXRvb2xzZXQtYmxvY2tzLWdyaWQudGItZ3JpZFtkYXRhLXRvb2xzZXQtYmxvY2tzLWdyaWQ9IjJiZjk4OTdhNDc4MzBlMDZiZWRhYzcyNzQwM2NlM2UzIl0geyBwYWRkaW5nLXJpZ2h0OiAwcHg7cGFkZGluZy1sZWZ0OiAwcHg7bWFyZ2luLXJpZ2h0OiAwcHg7bWFyZ2luLWxlZnQ6IDBweDtncmlkLXRlbXBsYXRlLWNvbHVtbnM6IG1pbm1heCgwLCAxZnIpO2dyaWQtY29sdW1uLWdhcDogMjRweDtncmlkLXJvdy1nYXA6IDQwcHg7Z3JpZC1hdXRvLWZsb3c6IHJvdyB9ICN0YmNzcyAud3AtYmxvY2stdG9vbHNldC1ibG9ja3MtZ3JpZC50Yi1ncmlkW2RhdGEtdG9vbHNldC1ibG9ja3MtZ3JpZD0iMmJmOTg5N2E0NzgzMGUwNmJlZGFjNzI3NDAzY2UzZTMiXSAgPiAudGItZ3JpZC1jb2x1bW46bnRoLW9mLXR5cGUoMW4rMSkgeyBncmlkLWNvbHVtbjogMSB9IC50Yi1idXR0b257Y29sb3I6I2YxZjFmMX0udGItYnV0dG9uLS1sZWZ0e3RleHQtYWxpZ246bGVmdH0udGItYnV0dG9uLS1jZW50ZXJ7dGV4dC1hbGlnbjpjZW50ZXJ9LnRiLWJ1dHRvbi0tcmlnaHR7dGV4dC1hbGlnbjpyaWdodH0udGItYnV0dG9uX19saW5re2NvbG9yOmluaGVyaXQ7Y3Vyc29yOnBvaW50ZXI7ZGlzcGxheTppbmxpbmUtYmxvY2s7bGluZS1oZWlnaHQ6MTAwJTt0ZXh0LWRlY29yYXRpb246bm9uZSAhaW1wb3J0YW50O3RleHQtYWxpZ246Y2VudGVyO3RyYW5zaXRpb246YWxsIDAuM3MgZWFzZX0udGItYnV0dG9uX19saW5rOmhvdmVyLC50Yi1idXR0b25fX2xpbms6Zm9jdXMsLnRiLWJ1dHRvbl9fbGluazp2aXNpdGVke2NvbG9yOmluaGVyaXR9LnRiLWJ1dHRvbl9fbGluazpob3ZlciAudGItYnV0dG9uX19jb250ZW50LC50Yi1idXR0b25fX2xpbms6Zm9jdXMgLnRiLWJ1dHRvbl9fY29udGVudCwudGItYnV0dG9uX19saW5rOnZpc2l0ZWQgLnRiLWJ1dHRvbl9fY29udGVudHtmb250LWZhbWlseTppbmhlcml0O2ZvbnQtc3R5bGU6aW5oZXJpdDtmb250LXdlaWdodDppbmhlcml0O2xldHRlci1zcGFjaW5nOmluaGVyaXQ7dGV4dC1kZWNvcmF0aW9uOmluaGVyaXQ7dGV4dC1zaGFkb3c6aW5oZXJpdDt0ZXh0LXRyYW5zZm9ybTppbmhlcml0fS50Yi1idXR0b25fX2NvbnRlbnR7dmVydGljYWwtYWxpZ246bWlkZGxlO3RyYW5zaXRpb246YWxsIDAuM3MgZWFzZX0udGItYnV0dG9uX19pY29ue3RyYW5zaXRpb246YWxsIDAuM3MgZWFzZTtkaXNwbGF5OmlubGluZS1ibG9jazt2ZXJ0aWNhbC1hbGlnbjptaWRkbGU7Zm9udC1zdHlsZTpub3JtYWwgIWltcG9ydGFudH0udGItYnV0dG9uX19pY29uOjpiZWZvcmV7Y29udGVudDphdHRyKGRhdGEtZm9udC1jb2RlKTtmb250LXdlaWdodDpub3JtYWwgIWltcG9ydGFudH0udGItYnV0dG9uX19saW5re2JhY2tncm91bmQtY29sb3I6IzQ0NDtib3JkZXItcmFkaXVzOjAuM2VtO2ZvbnQtc2l6ZToxLjNlbTttYXJnaW4tYm90dG9tOjAuNzZlbTtwYWRkaW5nOjAuNTVlbSAxLjVlbSAwLjU1ZW19I3RiY3NzIGgzLnRiLWhlYWRpbmdbZGF0YS10b29sc2V0LWJsb2Nrcy1oZWFkaW5nPSIwYmE5ZTNkNTQ0OWM0MTE5MDhhZWM2MWEwZjk5MGJhYiJdICB7IGZvbnQtc2l6ZTogMjRweDsgfSAgI3RiY3NzIGgzLnRiLWhlYWRpbmdbZGF0YS10b29sc2V0LWJsb2Nrcy1oZWFkaW5nPSIwYmE5ZTNkNTQ0OWM0MTE5MDhhZWM2MWEwZjk5MGJhYiJdIGEgIHsgZm9udC1zaXplOiAyNnB4OyB9IC50Yi1pbWFnZXtwb3NpdGlvbjpyZWxhdGl2ZTt0cmFuc2l0aW9uOnRyYW5zZm9ybSAwLjI1cyBlYXNlfS53cC1ibG9jay1pbWFnZSAudGItaW1hZ2UuYWxpZ25jZW50ZXJ7bWFyZ2luLWxlZnQ6YXV0bzttYXJnaW4tcmlnaHQ6YXV0b30udGItaW1hZ2UgaW1ne21heC13aWR0aDoxMDAlO2hlaWdodDphdXRvO3dpZHRoOmF1dG87dHJhbnNpdGlvbjp0cmFuc2Zvcm0gMC4yNXMgZWFzZX0udGItaW1hZ2UgLnRiLWltYWdlLWNhcHRpb24tZml0LXRvLWltYWdle2Rpc3BsYXk6dGFibGV9LnRiLWltYWdlIC50Yi1pbWFnZS1jYXB0aW9uLWZpdC10by1pbWFnZSAudGItaW1hZ2UtY2FwdGlvbntkaXNwbGF5OnRhYmxlLWNhcHRpb247Y2FwdGlvbi1zaWRlOmJvdHRvbX0udGItYnV0dG9ue2NvbG9yOiNmMWYxZjF9LnRiLWJ1dHRvbi0tbGVmdHt0ZXh0LWFsaWduOmxlZnR9LnRiLWJ1dHRvbi0tY2VudGVye3RleHQtYWxpZ246Y2VudGVyfS50Yi1idXR0b24tLXJpZ2h0e3RleHQtYWxpZ246cmlnaHR9LnRiLWJ1dHRvbl9fbGlua3tjb2xvcjppbmhlcml0O2N1cnNvcjpwb2ludGVyO2Rpc3BsYXk6aW5saW5lLWJsb2NrO2xpbmUtaGVpZ2h0OjEwMCU7dGV4dC1kZWNvcmF0aW9uOm5vbmUgIWltcG9ydGFudDt0ZXh0LWFsaWduOmNlbnRlcjt0cmFuc2l0aW9uOmFsbCAwLjNzIGVhc2V9LnRiLWJ1dHRvbl9fbGluazpob3ZlciwudGItYnV0dG9uX19saW5rOmZvY3VzLC50Yi1idXR0b25fX2xpbms6dmlzaXRlZHtjb2xvcjppbmhlcml0fS50Yi1idXR0b25fX2xpbms6aG92ZXIgLnRiLWJ1dHRvbl9fY29udGVudCwudGItYnV0dG9uX19saW5rOmZvY3VzIC50Yi1idXR0b25fX2NvbnRlbnQsLnRiLWJ1dHRvbl9fbGluazp2aXNpdGVkIC50Yi1idXR0b25fX2NvbnRlbnR7Zm9udC1mYW1pbHk6aW5oZXJpdDtmb250LXN0eWxlOmluaGVyaXQ7Zm9udC13ZWlnaHQ6aW5oZXJpdDtsZXR0ZXItc3BhY2luZzppbmhlcml0O3RleHQtZGVjb3JhdGlvbjppbmhlcml0O3RleHQtc2hhZG93OmluaGVyaXQ7dGV4dC10cmFuc2Zvcm06aW5oZXJpdH0udGItYnV0dG9uX19jb250ZW50e3ZlcnRpY2FsLWFsaWduOm1pZGRsZTt0cmFuc2l0aW9uOmFsbCAwLjNzIGVhc2V9LnRiLWJ1dHRvbl9faWNvbnt0cmFuc2l0aW9uOmFsbCAwLjNzIGVhc2U7ZGlzcGxheTppbmxpbmUtYmxvY2s7dmVydGljYWwtYWxpZ246bWlkZGxlO2ZvbnQtc3R5bGU6bm9ybWFsICFpbXBvcnRhbnR9LnRiLWJ1dHRvbl9faWNvbjo6YmVmb3Jle2NvbnRlbnQ6YXR0cihkYXRhLWZvbnQtY29kZSk7Zm9udC13ZWlnaHQ6bm9ybWFsICFpbXBvcnRhbnR9LnRiLWJ1dHRvbl9fbGlua3tiYWNrZ3JvdW5kLWNvbG9yOiM0NDQ7Ym9yZGVyLXJhZGl1czowLjNlbTtmb250LXNpemU6MS4zZW07bWFyZ2luLWJvdHRvbTowLjc2ZW07cGFkZGluZzowLjU1ZW0gMS41ZW0gMC41NWVtfS50Yi1pbWFnZXtwb3NpdGlvbjpyZWxhdGl2ZTt0cmFuc2l0aW9uOnRyYW5zZm9ybSAwLjI1cyBlYXNlfS53cC1ibG9jay1pbWFnZSAudGItaW1hZ2UuYWxpZ25jZW50ZXJ7bWFyZ2luLWxlZnQ6YXV0bzttYXJnaW4tcmlnaHQ6YXV0b30udGItaW1hZ2UgaW1ne21heC13aWR0aDoxMDAlO2hlaWdodDphdXRvO3dpZHRoOmF1dG87dHJhbnNpdGlvbjp0cmFuc2Zvcm0gMC4yNXMgZWFzZX0udGItaW1hZ2UgLnRiLWltYWdlLWNhcHRpb24tZml0LXRvLWltYWdle2Rpc3BsYXk6dGFibGV9LnRiLWltYWdlIC50Yi1pbWFnZS1jYXB0aW9uLWZpdC10by1pbWFnZSAudGItaW1hZ2UtY2FwdGlvbntkaXNwbGF5OnRhYmxlLWNhcHRpb247Y2FwdGlvbi1zaWRlOmJvdHRvbX0jdGJjc3MgLndwLWJsb2NrLXRvb2xzZXQtYmxvY2tzLWdyaWQtY29sdW1uLnRiLWdyaWQtY29sdW1uW2RhdGEtdG9vbHNldC1ibG9ja3MtZ3JpZC1jb2x1bW49IjYxNDNlYmI4YTNkZGU2YzY3YzhiN2EwNDcxNjZmNjNmIl0geyBkaXNwbGF5OiBmbGV4OyB9IC50Yi1idXR0b257Y29sb3I6I2YxZjFmMX0udGItYnV0dG9uLS1sZWZ0e3RleHQtYWxpZ246bGVmdH0udGItYnV0dG9uLS1jZW50ZXJ7dGV4dC1hbGlnbjpjZW50ZXJ9LnRiLWJ1dHRvbi0tcmlnaHR7dGV4dC1hbGlnbjpyaWdodH0udGItYnV0dG9uX19saW5re2NvbG9yOmluaGVyaXQ7Y3Vyc29yOnBvaW50ZXI7ZGlzcGxheTppbmxpbmUtYmxvY2s7bGluZS1oZWlnaHQ6MTAwJTt0ZXh0LWRlY29yYXRpb246bm9uZSAhaW1wb3J0YW50O3RleHQtYWxpZ246Y2VudGVyO3RyYW5zaXRpb246YWxsIDAuM3MgZWFzZX0udGItYnV0dG9uX19saW5rOmhvdmVyLC50Yi1idXR0b25fX2xpbms6Zm9jdXMsLnRiLWJ1dHRvbl9fbGluazp2aXNpdGVke2NvbG9yOmluaGVyaXR9LnRiLWJ1dHRvbl9fbGluazpob3ZlciAudGItYnV0dG9uX19jb250ZW50LC50Yi1idXR0b25fX2xpbms6Zm9jdXMgLnRiLWJ1dHRvbl9fY29udGVudCwudGItYnV0dG9uX19saW5rOnZpc2l0ZWQgLnRiLWJ1dHRvbl9fY29udGVudHtmb250LWZhbWlseTppbmhlcml0O2ZvbnQtc3R5bGU6aW5oZXJpdDtmb250LXdlaWdodDppbmhlcml0O2xldHRlci1zcGFjaW5nOmluaGVyaXQ7dGV4dC1kZWNvcmF0aW9uOmluaGVyaXQ7dGV4dC1zaGFkb3c6aW5oZXJpdDt0ZXh0LXRyYW5zZm9ybTppbmhlcml0fS50Yi1idXR0b25fX2NvbnRlbnR7dmVydGljYWwtYWxpZ246bWlkZGxlO3RyYW5zaXRpb246YWxsIDAuM3MgZWFzZX0udGItYnV0dG9uX19pY29ue3RyYW5zaXRpb246YWxsIDAuM3MgZWFzZTtkaXNwbGF5OmlubGluZS1ibG9jazt2ZXJ0aWNhbC1hbGlnbjptaWRkbGU7Zm9udC1zdHlsZTpub3JtYWwgIWltcG9ydGFudH0udGItYnV0dG9uX19pY29uOjpiZWZvcmV7Y29udGVudDphdHRyKGRhdGEtZm9udC1jb2RlKTtmb250LXdlaWdodDpub3JtYWwgIWltcG9ydGFudH0udGItYnV0dG9uX19saW5re2JhY2tncm91bmQtY29sb3I6IzQ0NDtib3JkZXItcmFkaXVzOjAuM2VtO2ZvbnQtc2l6ZToxLjNlbTttYXJnaW4tYm90dG9tOjAuNzZlbTtwYWRkaW5nOjAuNTVlbSAxLjVlbSAwLjU1ZW19ICN0YmNzcyBoMy50Yi1oZWFkaW5nW2RhdGEtdG9vbHNldC1ibG9ja3MtaGVhZGluZz0iNmFlOTgzMmU0NWI1NGU2MTRlMjQ0MWEwYzBiMThhN2MiXSBhICB7IGZvbnQtc2l6ZTogMjRweDsgfSAudGItaW1hZ2V7cG9zaXRpb246cmVsYXRpdmU7dHJhbnNpdGlvbjp0cmFuc2Zvcm0gMC4yNXMgZWFzZX0ud3AtYmxvY2staW1hZ2UgLnRiLWltYWdlLmFsaWduY2VudGVye21hcmdpbi1sZWZ0OmF1dG87bWFyZ2luLXJpZ2h0OmF1dG99LnRiLWltYWdlIGltZ3ttYXgtd2lkdGg6MTAwJTtoZWlnaHQ6YXV0bzt3aWR0aDphdXRvO3RyYW5zaXRpb246dHJhbnNmb3JtIDAuMjVzIGVhc2V9LnRiLWltYWdlIC50Yi1pbWFnZS1jYXB0aW9uLWZpdC10by1pbWFnZXtkaXNwbGF5OnRhYmxlfS50Yi1pbWFnZSAudGItaW1hZ2UtY2FwdGlvbi1maXQtdG8taW1hZ2UgLnRiLWltYWdlLWNhcHRpb257ZGlzcGxheTp0YWJsZS1jYXB0aW9uO2NhcHRpb24tc2lkZTpib3R0b219ICAudGItZ3JpZCwudGItZ3JpZD4uYmxvY2stZWRpdG9yLWlubmVyLWJsb2Nrcz4uYmxvY2stZWRpdG9yLWJsb2NrLWxpc3RfX2xheW91dHtkaXNwbGF5OmdyaWQ7Z3JpZC1yb3ctZ2FwOjI1cHg7Z3JpZC1jb2x1bW4tZ2FwOjI1cHh9LnRiLWdyaWQtaXRlbXtiYWNrZ3JvdW5kOiNkMzhhMDM7cGFkZGluZzozMHB4fS50Yi1ncmlkLWNvbHVtbntmbGV4LXdyYXA6d3JhcH0udGItZ3JpZC1jb2x1bW4+Knt3aWR0aDoxMDAlfS50Yi1ncmlkLWNvbHVtbi50Yi1ncmlkLWFsaWduLXRvcHt3aWR0aDoxMDAlO2Rpc3BsYXk6ZmxleDthbGlnbi1jb250ZW50OmZsZXgtc3RhcnR9LnRiLWdyaWQtY29sdW1uLnRiLWdyaWQtYWxpZ24tY2VudGVye3dpZHRoOjEwMCU7ZGlzcGxheTpmbGV4O2FsaWduLWNvbnRlbnQ6Y2VudGVyfS50Yi1ncmlkLWNvbHVtbi50Yi1ncmlkLWFsaWduLWJvdHRvbXt3aWR0aDoxMDAlO2Rpc3BsYXk6ZmxleDthbGlnbi1jb250ZW50OmZsZXgtZW5kfSAjdGJjc3MgLndwLWJsb2NrLXRvb2xzZXQtYmxvY2tzLWdyaWQudGItZ3JpZFtkYXRhLXRvb2xzZXQtYmxvY2tzLWdyaWQ9ImZiNjhlOWE4NzM4NjdiMzZkNWMxM2MwMTAwNTY0OGUyIl0geyBncmlkLXRlbXBsYXRlLWNvbHVtbnM6IG1pbm1heCgwLCAxZnIpO2dyaWQtYXV0by1mbG93OiByb3cgfSAjdGJjc3MgLndwLWJsb2NrLXRvb2xzZXQtYmxvY2tzLWdyaWQudGItZ3JpZFtkYXRhLXRvb2xzZXQtYmxvY2tzLWdyaWQ9ImZiNjhlOWE4NzM4NjdiMzZkNWMxM2MwMTAwNTY0OGUyIl0gID4gLnRiLWdyaWQtY29sdW1uOm50aC1vZi10eXBlKDFuKzEpIHsgZ3JpZC1jb2x1bW46IDEgfSAjdGJjc3MgLndwLWJsb2NrLXRvb2xzZXQtYmxvY2tzLWdyaWQtY29sdW1uLnRiLWdyaWQtY29sdW1uW2RhdGEtdG9vbHNldC1ibG9ja3MtZ3JpZC1jb2x1bW49IjMwMzRmYmU4ODZjMTEwNTRlOTViNDZiMDlkM2U0MTEyIl0geyBkaXNwbGF5OiBmbGV4OyB9IC50Yi1pbWFnZXtwb3NpdGlvbjpyZWxhdGl2ZTt0cmFuc2l0aW9uOnRyYW5zZm9ybSAwLjI1cyBlYXNlfS53cC1ibG9jay1pbWFnZSAudGItaW1hZ2UuYWxpZ25jZW50ZXJ7bWFyZ2luLWxlZnQ6YXV0bzttYXJnaW4tcmlnaHQ6YXV0b30udGItaW1hZ2UgaW1ne21heC13aWR0aDoxMDAlO2hlaWdodDphdXRvO3dpZHRoOmF1dG87dHJhbnNpdGlvbjp0cmFuc2Zvcm0gMC4yNXMgZWFzZX0udGItaW1hZ2UgLnRiLWltYWdlLWNhcHRpb24tZml0LXRvLWltYWdle2Rpc3BsYXk6dGFibGV9LnRiLWltYWdlIC50Yi1pbWFnZS1jYXB0aW9uLWZpdC10by1pbWFnZSAudGItaW1hZ2UtY2FwdGlvbntkaXNwbGF5OnRhYmxlLWNhcHRpb247Y2FwdGlvbi1zaWRlOmJvdHRvbX0gI3RiY3NzIC50Yi1pbWFnZVtkYXRhLXRvb2xzZXQtYmxvY2tzLWltYWdlPSJjMTU3YmIxYWIyY2M5NTM5YmUyYzYzN2IxNjQzNTZkMyJdIC50Yi1pbWFnZS1zaGFkb3ctMSB7IG1hcmdpbi10b3A6IDMwcHg7bWFyZ2luLXJpZ2h0OiAzMHB4O21hcmdpbi1sZWZ0OiAzMHB4OyB9IC50Yi1pbWFnZXtwb3NpdGlvbjpyZWxhdGl2ZTt0cmFuc2l0aW9uOnRyYW5zZm9ybSAwLjI1cyBlYXNlfS53cC1ibG9jay1pbWFnZSAudGItaW1hZ2UuYWxpZ25jZW50ZXJ7bWFyZ2luLWxlZnQ6YXV0bzttYXJnaW4tcmlnaHQ6YXV0b30udGItaW1hZ2UgaW1ne21heC13aWR0aDoxMDAlO2hlaWdodDphdXRvO3dpZHRoOmF1dG87dHJhbnNpdGlvbjp0cmFuc2Zvcm0gMC4yNXMgZWFzZX0udGItaW1hZ2UgLnRiLWltYWdlLWNhcHRpb24tZml0LXRvLWltYWdle2Rpc3BsYXk6dGFibGV9LnRiLWltYWdlIC50Yi1pbWFnZS1jYXB0aW9uLWZpdC10by1pbWFnZSAudGItaW1hZ2UtY2FwdGlvbntkaXNwbGF5OnRhYmxlLWNhcHRpb247Y2FwdGlvbi1zaWRlOmJvdHRvbX0udGItaW1hZ2V7cG9zaXRpb246cmVsYXRpdmU7dHJhbnNpdGlvbjp0cmFuc2Zvcm0gMC4yNXMgZWFzZX0ud3AtYmxvY2staW1hZ2UgLnRiLWltYWdlLmFsaWduY2VudGVye21hcmdpbi1sZWZ0OmF1dG87bWFyZ2luLXJpZ2h0OmF1dG99LnRiLWltYWdlIGltZ3ttYXgtd2lkdGg6MTAwJTtoZWlnaHQ6YXV0bzt3aWR0aDphdXRvO3RyYW5zaXRpb246dHJhbnNmb3JtIDAuMjVzIGVhc2V9LnRiLWltYWdlIC50Yi1pbWFnZS1jYXB0aW9uLWZpdC10by1pbWFnZXtkaXNwbGF5OnRhYmxlfS50Yi1pbWFnZSAudGItaW1hZ2UtY2FwdGlvbi1maXQtdG8taW1hZ2UgLnRiLWltYWdlLWNhcHRpb257ZGlzcGxheTp0YWJsZS1jYXB0aW9uO2NhcHRpb24tc2lkZTpib3R0b219ICN0YmNzcyAudGItaW1hZ2VbZGF0YS10b29sc2V0LWJsb2Nrcy1pbWFnZT0iNWFlYzdjNjU0ZThjNjkyMDk4NGFlN2IyOTJhYWJlMGUiXSAudGItaW1hZ2Utc2hhZG93LTEgeyBtYXJnaW4tdG9wOiAzMHB4O21hcmdpbi1yaWdodDogMzBweDttYXJnaW4tbGVmdDogMzBweDsgfSAudGItZ3JpZCwudGItZ3JpZD4uYmxvY2stZWRpdG9yLWlubmVyLWJsb2Nrcz4uYmxvY2stZWRpdG9yLWJsb2NrLWxpc3RfX2xheW91dHtkaXNwbGF5OmdyaWQ7Z3JpZC1yb3ctZ2FwOjI1cHg7Z3JpZC1jb2x1bW4tZ2FwOjI1cHh9LnRiLWdyaWQtaXRlbXtiYWNrZ3JvdW5kOiNkMzhhMDM7cGFkZGluZzozMHB4fS50Yi1ncmlkLWNvbHVtbntmbGV4LXdyYXA6d3JhcH0udGItZ3JpZC1jb2x1bW4+Knt3aWR0aDoxMDAlfS50Yi1ncmlkLWNvbHVtbi50Yi1ncmlkLWFsaWduLXRvcHt3aWR0aDoxMDAlO2Rpc3BsYXk6ZmxleDthbGlnbi1jb250ZW50OmZsZXgtc3RhcnR9LnRiLWdyaWQtY29sdW1uLnRiLWdyaWQtYWxpZ24tY2VudGVye3dpZHRoOjEwMCU7ZGlzcGxheTpmbGV4O2FsaWduLWNvbnRlbnQ6Y2VudGVyfS50Yi1ncmlkLWNvbHVtbi50Yi1ncmlkLWFsaWduLWJvdHRvbXt3aWR0aDoxMDAlO2Rpc3BsYXk6ZmxleDthbGlnbi1jb250ZW50OmZsZXgtZW5kfSAjdGJjc3MgLndwLWJsb2NrLXRvb2xzZXQtYmxvY2tzLWdyaWQudGItZ3JpZFtkYXRhLXRvb2xzZXQtYmxvY2tzLWdyaWQ9ImYyMjJmMzU5MjZjMjA2ZWY4MTIyMGRhYzY3OTQ1MzY1Il0geyBncmlkLXRlbXBsYXRlLWNvbHVtbnM6IG1pbm1heCgwLCAxZnIpO2dyaWQtYXV0by1mbG93OiByb3cgfSAjdGJjc3MgLndwLWJsb2NrLXRvb2xzZXQtYmxvY2tzLWdyaWQudGItZ3JpZFtkYXRhLXRvb2xzZXQtYmxvY2tzLWdyaWQ9ImYyMjJmMzU5MjZjMjA2ZWY4MTIyMGRhYzY3OTQ1MzY1Il0gID4gLnRiLWdyaWQtY29sdW1uOm50aC1vZi10eXBlKDFuKzEpIHsgZ3JpZC1jb2x1bW46IDEgfSAgIC50Yi1pbWFnZXtwb3NpdGlvbjpyZWxhdGl2ZTt0cmFuc2l0aW9uOnRyYW5zZm9ybSAwLjI1cyBlYXNlfS53cC1ibG9jay1pbWFnZSAudGItaW1hZ2UuYWxpZ25jZW50ZXJ7bWFyZ2luLWxlZnQ6YXV0bzttYXJnaW4tcmlnaHQ6YXV0b30udGItaW1hZ2UgaW1ne21heC13aWR0aDoxMDAlO2hlaWdodDphdXRvO3dpZHRoOmF1dG87dHJhbnNpdGlvbjp0cmFuc2Zvcm0gMC4yNXMgZWFzZX0udGItaW1hZ2UgLnRiLWltYWdlLWNhcHRpb24tZml0LXRvLWltYWdle2Rpc3BsYXk6dGFibGV9LnRiLWltYWdlIC50Yi1pbWFnZS1jYXB0aW9uLWZpdC10by1pbWFnZSAudGItaW1hZ2UtY2FwdGlvbntkaXNwbGF5OnRhYmxlLWNhcHRpb247Y2FwdGlvbi1zaWRlOmJvdHRvbX0gI3RiY3NzIC50Yi1pbWFnZVtkYXRhLXRvb2xzZXQtYmxvY2tzLWltYWdlPSI4Y2I4MTA4MWMyNTY0OWY2ODc2MGI1ZTYzZmZlNGU0NSJdIC50Yi1pbWFnZS1zaGFkb3ctMSB7IG1hcmdpbi10b3A6IDMwcHg7bWFyZ2luLXJpZ2h0OiAzMHB4O21hcmdpbi1sZWZ0OiAzMHB4OyB9IC50Yi1pbWFnZXtwb3NpdGlvbjpyZWxhdGl2ZTt0cmFuc2l0aW9uOnRyYW5zZm9ybSAwLjI1cyBlYXNlfS53cC1ibG9jay1pbWFnZSAudGItaW1hZ2UuYWxpZ25jZW50ZXJ7bWFyZ2luLWxlZnQ6YXV0bzttYXJnaW4tcmlnaHQ6YXV0b30udGItaW1hZ2UgaW1ne21heC13aWR0aDoxMDAlO2hlaWdodDphdXRvO3dpZHRoOmF1dG87dHJhbnNpdGlvbjp0cmFuc2Zvcm0gMC4yNXMgZWFzZX0udGItaW1hZ2UgLnRiLWltYWdlLWNhcHRpb24tZml0LXRvLWltYWdle2Rpc3BsYXk6dGFibGV9LnRiLWltYWdlIC50Yi1pbWFnZS1jYXB0aW9uLWZpdC10by1pbWFnZSAudGItaW1hZ2UtY2FwdGlvbntkaXNwbGF5OnRhYmxlLWNhcHRpb247Y2FwdGlvbi1zaWRlOmJvdHRvbX0gLnRiLWdyaWQsLnRiLWdyaWQ+LmJsb2NrLWVkaXRvci1pbm5lci1ibG9ja3M+LmJsb2NrLWVkaXRvci1ibG9jay1saXN0X19sYXlvdXR7ZGlzcGxheTpncmlkO2dyaWQtcm93LWdhcDoyNXB4O2dyaWQtY29sdW1uLWdhcDoyNXB4fS50Yi1ncmlkLWl0ZW17YmFja2dyb3VuZDojZDM4YTAzO3BhZGRpbmc6MzBweH0udGItZ3JpZC1jb2x1bW57ZmxleC13cmFwOndyYXB9LnRiLWdyaWQtY29sdW1uPip7d2lkdGg6MTAwJX0udGItZ3JpZC1jb2x1bW4udGItZ3JpZC1hbGlnbi10b3B7d2lkdGg6MTAwJTtkaXNwbGF5OmZsZXg7YWxpZ24tY29udGVudDpmbGV4LXN0YXJ0fS50Yi1ncmlkLWNvbHVtbi50Yi1ncmlkLWFsaWduLWNlbnRlcnt3aWR0aDoxMDAlO2Rpc3BsYXk6ZmxleDthbGlnbi1jb250ZW50OmNlbnRlcn0udGItZ3JpZC1jb2x1bW4udGItZ3JpZC1hbGlnbi1ib3R0b217d2lkdGg6MTAwJTtkaXNwbGF5OmZsZXg7YWxpZ24tY29udGVudDpmbGV4LWVuZH0gI3RiY3NzIC53cC1ibG9jay10b29sc2V0LWJsb2Nrcy1ncmlkLnRiLWdyaWRbZGF0YS10b29sc2V0LWJsb2Nrcy1ncmlkPSJkZGFmNmY1OTJmMTZkNmZhMGJhYTliZTcxNzE1OWE4NyJdIHsgZ3JpZC10ZW1wbGF0ZS1jb2x1bW5zOiBtaW5tYXgoMCwgMWZyKTtncmlkLWF1dG8tZmxvdzogcm93IH0gI3RiY3NzIC53cC1ibG9jay10b29sc2V0LWJsb2Nrcy1ncmlkLnRiLWdyaWRbZGF0YS10b29sc2V0LWJsb2Nrcy1ncmlkPSJkZGFmNmY1OTJmMTZkNmZhMGJhYTliZTcxNzE1OWE4NyJdICA+IC50Yi1ncmlkLWNvbHVtbjpudGgtb2YtdHlwZSgxbisxKSB7IGdyaWQtY29sdW1uOiAxIH0gLnRiLWJ1dHRvbntjb2xvcjojZjFmMWYxfS50Yi1idXR0b24tLWxlZnR7dGV4dC1hbGlnbjpsZWZ0fS50Yi1idXR0b24tLWNlbnRlcnt0ZXh0LWFsaWduOmNlbnRlcn0udGItYnV0dG9uLS1yaWdodHt0ZXh0LWFsaWduOnJpZ2h0fS50Yi1idXR0b25fX2xpbmt7Y29sb3I6aW5oZXJpdDtjdXJzb3I6cG9pbnRlcjtkaXNwbGF5OmlubGluZS1ibG9jaztsaW5lLWhlaWdodDoxMDAlO3RleHQtZGVjb3JhdGlvbjpub25lICFpbXBvcnRhbnQ7dGV4dC1hbGlnbjpjZW50ZXI7dHJhbnNpdGlvbjphbGwgMC4zcyBlYXNlfS50Yi1idXR0b25fX2xpbms6aG92ZXIsLnRiLWJ1dHRvbl9fbGluazpmb2N1cywudGItYnV0dG9uX19saW5rOnZpc2l0ZWR7Y29sb3I6aW5oZXJpdH0udGItYnV0dG9uX19saW5rOmhvdmVyIC50Yi1idXR0b25fX2NvbnRlbnQsLnRiLWJ1dHRvbl9fbGluazpmb2N1cyAudGItYnV0dG9uX19jb250ZW50LC50Yi1idXR0b25fX2xpbms6dmlzaXRlZCAudGItYnV0dG9uX19jb250ZW50e2ZvbnQtZmFtaWx5OmluaGVyaXQ7Zm9udC1zdHlsZTppbmhlcml0O2ZvbnQtd2VpZ2h0OmluaGVyaXQ7bGV0dGVyLXNwYWNpbmc6aW5oZXJpdDt0ZXh0LWRlY29yYXRpb246aW5oZXJpdDt0ZXh0LXNoYWRvdzppbmhlcml0O3RleHQtdHJhbnNmb3JtOmluaGVyaXR9LnRiLWJ1dHRvbl9fY29udGVudHt2ZXJ0aWNhbC1hbGlnbjptaWRkbGU7dHJhbnNpdGlvbjphbGwgMC4zcyBlYXNlfS50Yi1idXR0b25fX2ljb257dHJhbnNpdGlvbjphbGwgMC4zcyBlYXNlO2Rpc3BsYXk6aW5saW5lLWJsb2NrO3ZlcnRpY2FsLWFsaWduOm1pZGRsZTtmb250LXN0eWxlOm5vcm1hbCAhaW1wb3J0YW50fS50Yi1idXR0b25fX2ljb246OmJlZm9yZXtjb250ZW50OmF0dHIoZGF0YS1mb250LWNvZGUpO2ZvbnQtd2VpZ2h0Om5vcm1hbCAhaW1wb3J0YW50fS50Yi1idXR0b25fX2xpbmt7YmFja2dyb3VuZC1jb2xvcjojNDQ0O2JvcmRlci1yYWRpdXM6MC4zZW07Zm9udC1zaXplOjEuM2VtO21hcmdpbi1ib3R0b206MC43NmVtO3BhZGRpbmc6MC41NWVtIDEuNWVtIDAuNTVlbX0gICN0YmNzcyAud3AtYmxvY2stdG9vbHNldC1ibG9ja3MtZ3JpZC1jb2x1bW4udGItZ3JpZC1jb2x1bW5bZGF0YS10b29sc2V0LWJsb2Nrcy1ncmlkLWNvbHVtbj0iZjU4NmZmN2JmZTFkNzMxN2M2MzE2MmVjN2I3MDM5ZWQiXSB7IGRpc3BsYXk6IGZsZXg7IH0gLnRiLWltYWdle3Bvc2l0aW9uOnJlbGF0aXZlO3RyYW5zaXRpb246dHJhbnNmb3JtIDAuMjVzIGVhc2V9LndwLWJsb2NrLWltYWdlIC50Yi1pbWFnZS5hbGlnbmNlbnRlcnttYXJnaW4tbGVmdDphdXRvO21hcmdpbi1yaWdodDphdXRvfS50Yi1pbWFnZSBpbWd7bWF4LXdpZHRoOjEwMCU7aGVpZ2h0OmF1dG87d2lkdGg6YXV0bzt0cmFuc2l0aW9uOnRyYW5zZm9ybSAwLjI1cyBlYXNlfS50Yi1pbWFnZSAudGItaW1hZ2UtY2FwdGlvbi1maXQtdG8taW1hZ2V7ZGlzcGxheTp0YWJsZX0udGItaW1hZ2UgLnRiLWltYWdlLWNhcHRpb24tZml0LXRvLWltYWdlIC50Yi1pbWFnZS1jYXB0aW9ue2Rpc3BsYXk6dGFibGUtY2FwdGlvbjtjYXB0aW9uLXNpZGU6Ym90dG9tfSAjdGJjc3MgLnRiLWltYWdlW2RhdGEtdG9vbHNldC1ibG9ja3MtaW1hZ2U9ImRmNzZiODAwMzViZGUxODViNGQxMDgwMGQ1ZTg3M2ZmIl0gLnRiLWltYWdlLXNoYWRvdy0xIHsgbWFyZ2luLXRvcDogMzBweDttYXJnaW4tcmlnaHQ6IDMwcHg7bWFyZ2luLWxlZnQ6IDMwcHg7IH0gLnRiLWNvbnRhaW5lciAudGItY29udGFpbmVyLWlubmVye3dpZHRoOjEwMCU7bWFyZ2luOjAgYXV0b30gIH0g
What Is the Big Three Outdoor Design Strategy?
Planning a backyard patio can feel overwhelming because every choice seems connected: the fireplace, the kitchen, the dining area, the seating, the traffic flow, the view, and the budget. The Big Three strategy makes the process easier by breaking the patio into three familiar outdoor rooms: a living room, a dining area, and a kitchen.
Instead of trying to design the entire backyard at once, start by deciding where those three zones belong and how they should relate to each other. Once the main zones make sense, it becomes much easier to choose layouts, features, kits, and finishing details without losing the overall plan.
Think of Your Backyard Like an Open Floor Plan
When you first start planning your patio, the number of decisions can feel overwhelming. But here is the shift that makes it easier: treat your backyard like an open floor plan. Indoors, you already know how rooms work. You have a kitchen for cooking, a dining room for meals, and a living room for relaxing. The same logic applies outside.
By dividing your patio into the Big Three familiar zones — cooking, dining, and lounging — you make the design process more approachable. Instead of trying to design the entire backyard at once, you can organize the space around the way people already live, gather, eat, and relax.
Indoors, you already know how rooms work: a kitchen for cooking, a dining room for meals, and a living room for relaxing. The same logic applies outside.
How to Zone a Patio Layout Step by Step
Once you understand the Big Three strategy, the next step is turning the idea into a real patio layout. You do not need a rigid, over-engineered blueprint yet. Start by blocking out the three main outdoor rooms, then look at how people will move between them.
Block Out the Main Outdoor Rooms
Before choosing materials, kits, furniture, or finishing details, decide where each outdoor room belongs. Think of this like arranging an open-concept interior. You are not placing every chair or choosing every feature yet. You are simply giving the kitchen, dining area, and living room their basic positions.
Visualize each zone as a simple block on your patio plan. Move them around. Rotate them. Stretch them. Shrink them. Try the kitchen along the house, the dining area between the kitchen and living room, or the living area around a fireplace or fire pit.
The goal is not perfection yet. The goal is to create a starting footprint where each zone has a clear purpose and the whole patio begins to feel intentional.
Plan Traffic Flow Between Zones
Once the three main zones are blocked out, look at how people will move between them.
Inside a house, traffic flow is controlled by walls, halls, and doorways. Outside, the rules are more flexible. There are fewer hard boundaries, and the gathering spaces themselves often become the walking paths. A chair gets pulled out, a conversation shifts, someone walks from the grill to the table, and the layout has to keep working.
Instead of forcing strict lanes, focus on the natural relationships between the kitchen, dining, and living zones.
The Indoor-to-Outdoor Bridge: Place the outdoor kitchen where it has an easy connection to the indoor kitchen, back door, or main access point. You do not want to weave through dining chairs and conversation areas every time you carry food, drinks, dishes, or supplies outside.
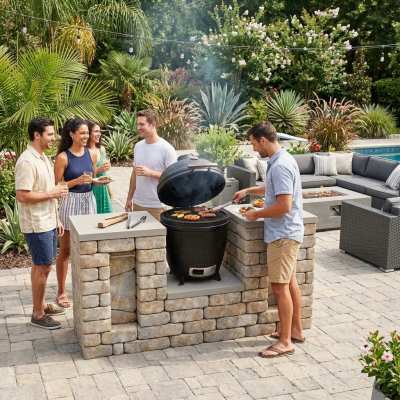
The Chef’s Zone: Position the cooking area so the cook can stay connected to the dining and living spaces without standing in the middle of guest traffic. The grill, pizza oven, kamado, or cooking station should feel part of the party, but the hot zone should not become the main walkway.
The View and the Anchor: Think about what people will see from the house, the dining table, and the main seating area. If the living zone is anchored by a fireplace, fire pit, seat wall, or other permanent feature, use it to frame the space and give the patio a natural focal point.
Keep shifting the Big Three zones until the relationship between cooking, dining, and lounging feels natural. The right layout should make it easy to cook, serve, sit, move, and gather without feeling like any one zone is fighting the others.
Choose the Outdoor Room You Want to Plan Next
Plan Your Outdoor Living Room
Your outdoor living room is where the real life of the patio happens—lounging, laughing, late-night chats, and fireside relaxation. Inside your house, a living room layout is easy because you have drywall to push a couch against. Outside, you need a visual anchor to replicate that feeling of security and comfort.
Good (Basic): A few comfortable chairs arranged around a portable fire pit or chiminea. Simple, functional, and highly budget-friendly.Better (Mid-Range): A matching deep-seating furniture set paired with a permanent, built-in fire table or gas fire bowl.Best (High-End): A fully realized outdoor room anchored by a permanent masonry fireplace.
The Master Craftsman Insight: A heavy, permanent fireplace does something a small fire pit simply can’t—it creates a literal “focal wall” in an open backyard. It blocks the prevailing wind, stops the eye from wandering into the neighbor’s yard, and gives you a definitive anchor to arrange your couches and sectional around naturally.
Plan Your Outdoor Dining Room
Your outdoor dining room is the bridge between cooking and lounging. It hosts everything from casual weeknight family dinners to large weekend cookouts. The trick here is keeping the space flexible so it doesn’t feel like a rigid, formal boardroom in the middle of nature.
Good (Basic): A durable outdoor dining table and chairs—just enough to bring everyone together.Better (Mid-Range): Adding an expansive market umbrella or a sail shade for daytime sun protection and temperature control.Best (High-End): Placing your dining area under a permanent pergola or pavilion structure, complete with ambient lighting, potted greenery, and a dedicated serving buffet or side table.
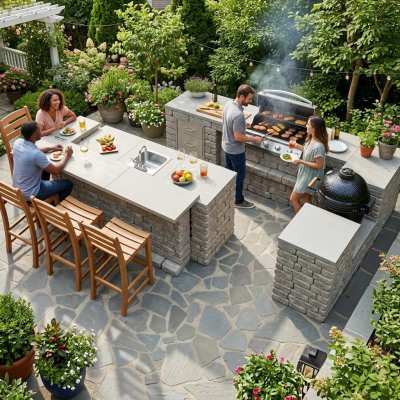
The Master Craftsman Insight: In modern backyard layouts, the dining area rarely stands completely alone. It naturally encroaches on the kitchen’s space. If you are working with a tight footprint, don’t try to force a massive, standalone dining table. Instead, consider a hybrid approach—such as a bar-height counter or a wrap-around island attached to your kitchen module. It serves as prep space while you cook, and instantly transitions into casual dining seating when the food is ready.
Plan Your Outdoor Kitchen Layout
This is the operational heart of your patio. But warning: this is also where backyard projects go to die a slow, over-budget death due to “feature creep.”
Good (Basic): A premium, standalone grill positioned safely with clear access to the main patio.Better (Mid-Range): A modular grill island that wraps your cooking element in durable concrete, providing dedicated counter space and clean tool storage.Best (High-End): A strategic multi-module custom outdoor kitchen featuring a primary cooking element, integrated beverage refrigeration, and massive flat stone countertops.
The Master Craftsman Insight: Beware the “Appliance Trap”
Look at any online outdoor kitchen forum and you will see the exact same mistake made a thousand times: someone builds a massive island packed with a 42-inch grill, a smoker, a built-in griddle, and a pizza oven. They end up with 24 square feet of cooking elements and a pathetic 6 square feet of counter space. They have every cooking feature on the planet, but absolutely nowhere to put a plate.
You do not need a mini-restaurant in your backyard to host an unforgettable party. One high-quality outdoor cooking feature is more than enough to anchor decades of good times. What you actually need is place to gather, prep, serve, and eat.
Think about the actual mechanics of outdoor cooking:
The Raw Side: You need a clean zone to drop heavy trays of raw, seasoned food.The Hot Zone: The food is cooked on the grill.The Cooked Side: You need an entirely separate, clean zone to place your finished serving platters without cross-contaminating with the raw side.
Because you have to keep raw and cooked foods separate, the staging and serving zones require significantly more physical space than the actual cooking surface itself. When planning your layout, prioritize a massive, open “landing strip”—at least 18 to 24 inches of clear, flat countertop on both sides of your primary grill. If you have the space to choose between adding a second cooking appliance or adding 3 feet of open countertop, choose the countertop every single time. Your sanity, your guests, and your serving platters will thank you. Nobody will skip your parties because you didn’t add the pizza oven.
Layer in the Details That Make the Patio Work
Once your Big Three layout is locked in and your functional zones have the breathing room they need, it’s time to layer in the final elements that turn a raw hardscape into a finished space. Think of these finishing touches as the tools that soften the hard edges of concrete and stone, tying the open floor plan together:
Choose Functional, Durable Furniture: Buy furniture that fits the scale of your open layout, not just the aesthetic. Look for clean lines that maintain a sense of openness. You want to match the weight and performance of your heavy outdoor features without overcrowding the fluid paths between them.
Layer in Strategic Greenery: Plants do more than look pretty—they are your invisible walls. Use potted plants, large planters, or raised beds to naturally block a sightline, define the edge of a traffic path, or soften the transition from your concrete pavers to the open yard.
Add Purposeful Outdoor Lighting: Good lighting keeps your patio functional long after sunset. Skip the blinding floodlights and opt for a layered approach. Use low-voltage path lighting to subtly guide movement, uplighting into trees or planters to create depth, and warm bistro string lights to give your dining or living zone a cozy, inviting glow.